Copyright © 2020 Traco Systems a.s.
version 1.2 (2020.3)
Table Of Contents
- Table Of Contents
- Preface
- Introduction
- How to Access Cloud UX | Traco GFX
- Cloud UX | Traco GFX Interface
- Find Graphics
- GFX Editor
- GFX List
- MetaCaptions
- Traco GFX Timeline
- Traco GFX Postrenderer
- Integrations with MOS based systems
- Octopus
- iNews
Preface
This is an essential guide for Traco GFX app in MediaCentral | Cloud UX, with the basic information about how to log on and off, and how to use the system.
Traco GFX and Cloud UX at your organization may be configured differently than shown in this document. Menu options will vary according to modules used by your organization, templates and other GFX objects will have different names and may be organised in a different way. Ask your system administrator if you think something is missing or configuration changes are required.
Introduction
Traco GFX is an application created for the Avid MediaCentral platform with an aim to integrate third party graphical systems into the platform. Traco GFX is a module based application which means that multiple types of graphical modules can be configured and added to the app. This version of Traco GFX supports graphical modules of these systems:
- VizRT Content Pilot
- Traco MetaCaptions
The main purpose of Taco GFX is to allow the users browse, create and edit graphical objects (in other words GFX or GFXs) and set their timing for Avid assets. Timing GFXs for Avid assets does not modify the source media files in the Avid environment, however the assets can be published with fully rendered and timed graphics using the post-renderer. Furthermore of the post-rendering the GFXs from the VizRT Content Pilot module can be used as MOS objects for different NRCS like iNews or Octopus.
Both the post-rendering and the MOS workflow are described later in this document.
How to Access Cloud UX | Traco GFX
Every user needs their own specific login name and a password to access Cloud UX. After signing in, each user can open the Traco GFX application from the Cloud UX applications menu bar, but the content and the user roles are dependent upon the system configurations. If some content is missing from Traco GFX, please contact system administrators.
Cloud UX | Traco GFX Interface
Opening the application for the first time will display the template browser with predefined filters applied.
In the header of the Traco GFX application a menu bar is always shown for easier in-app navigation. Traco GFX menu bar always displays buttons for the basic views (pages) of the app which are the template browser (Find Graphics), dataelement editor (GFX Editor), list of GFXs of the loaded sequence (GFX List) and the MetaCaptions editor. Views can be openened by clicking on these buttons in the Traco GFX application's header.

Find Graphics
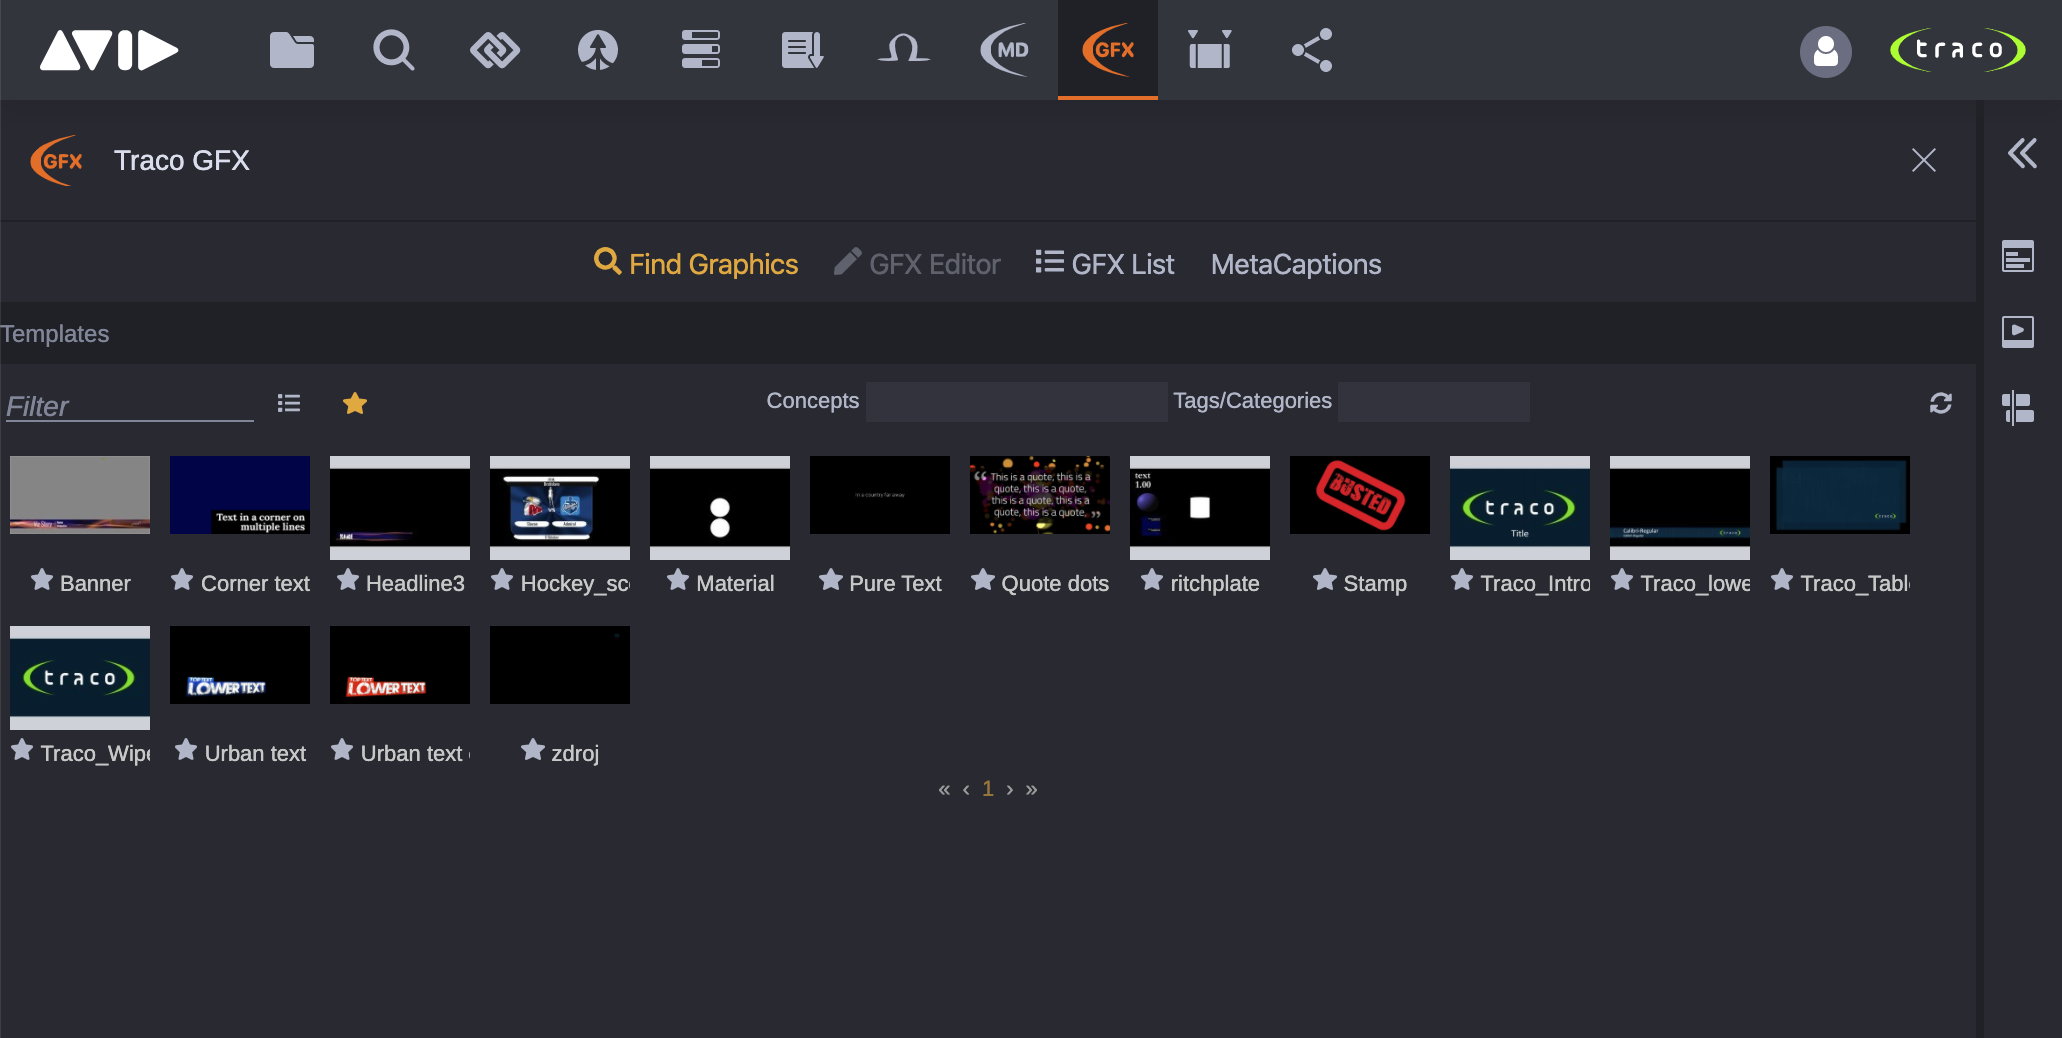
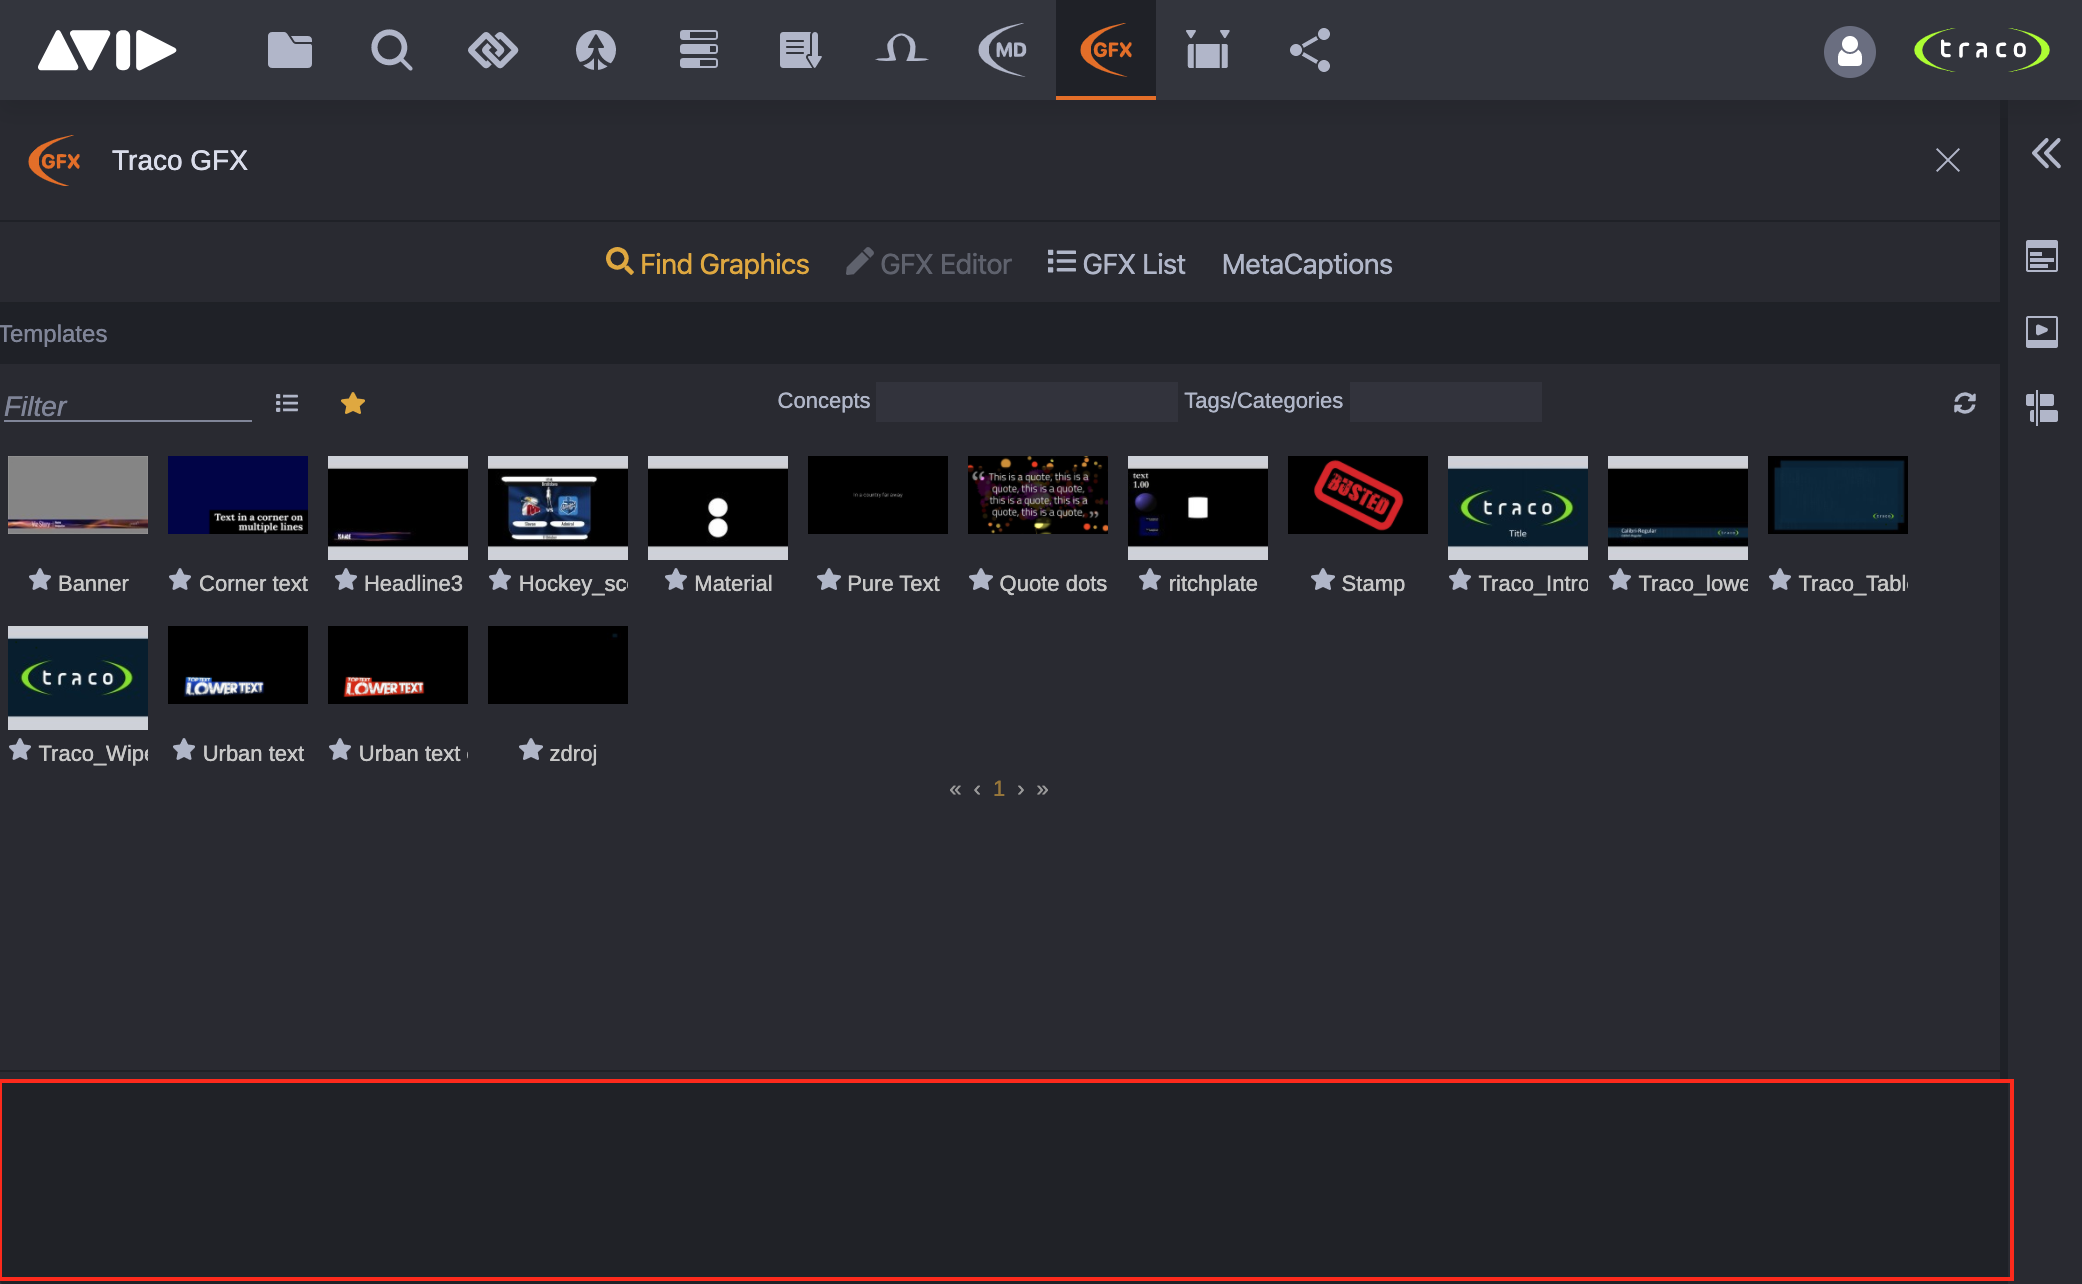
Clicking the Find Graphics button will open the template browser.
Toolbar
In the toolbar, predefined search filters can be changed for displaying only the necessary templates.

- Filter: Simple text filter.
 /
/  : Switching between list and grid view.
 /
/  : If activated, only favorite templates are shown. If not activated, all templates are shown.
- Concepts: Filter templates based on concepts.
- Tags/Categories: Filter templates based on tags and categories.
 : Refresh templates list with applied filters (the list of templates is not updating automatically).
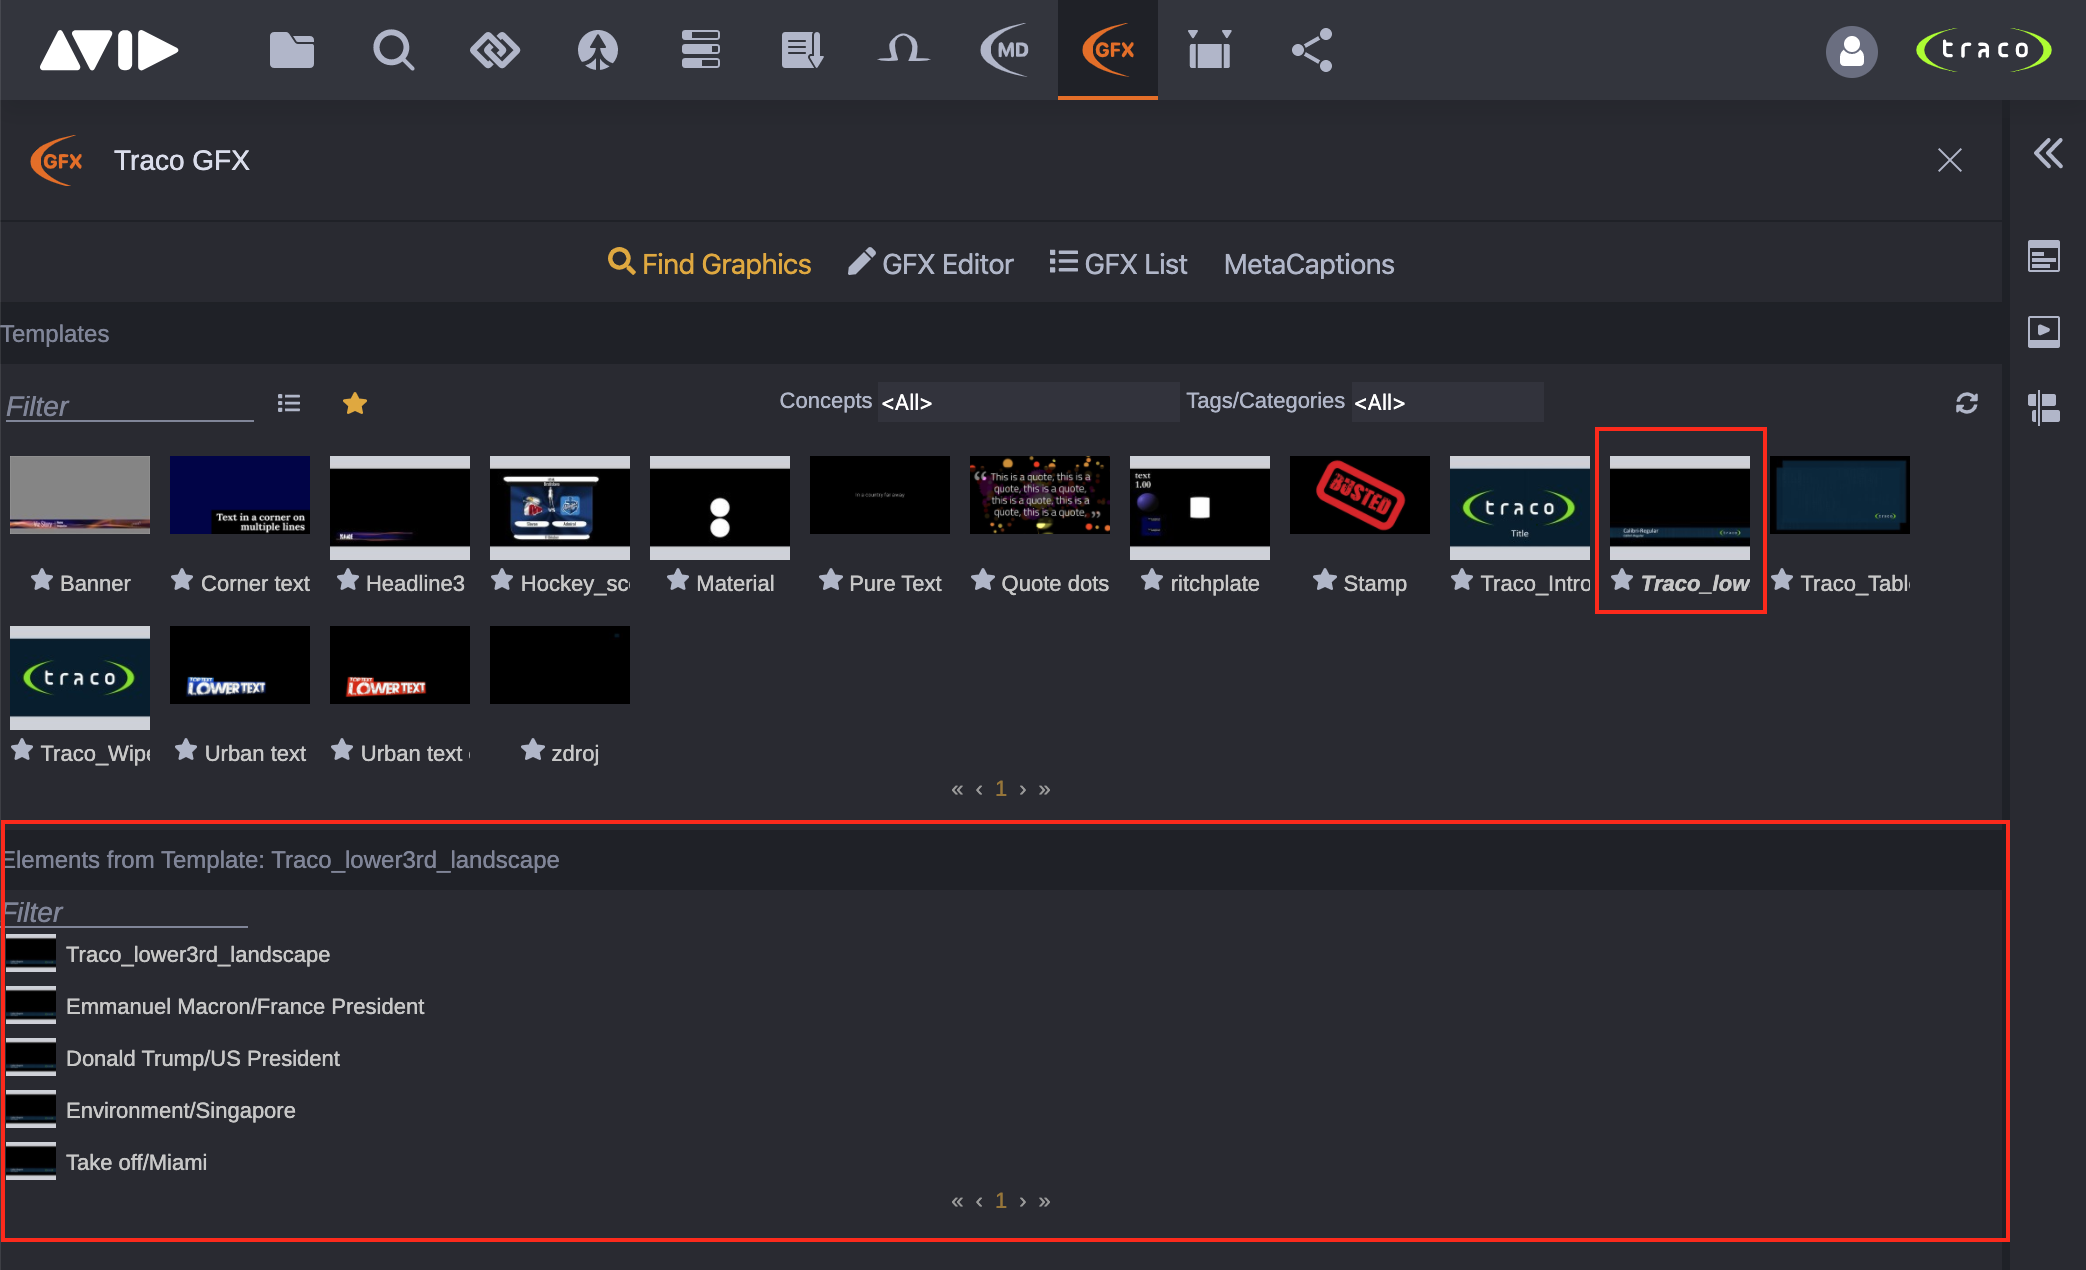
Open Template's Dataelements List
Saved dataelements of a template can be displayed by single clicking on a template in the list. By default the last 100 dataelements are displayed for each template. The dataelements are displayed with paging and are listed regardless of their origin which means they are listed even if they were created from other Viz Pilot client application like Pilot Edge, Pilot ActiveX, etc.
Open Existing Dataelement
Double clicking a datelement in the datelements list will open it in the GFX Editor.
Create New Dataelement
Users can create new dataelements from templates by double clicking a template, what will automatically open the GFX Editor with the predefined dataelement values.
GFX Editor
Using the GFX Editor requires to distinguish the differences between expressions dataelement and GFX in concept of the Traco GFX app. Dataelement is the regular expression used in Viz Content Pilot environment (created in Viz Pilot ActiveX, Pilot Edge, etc.), while expression GFX bundles a specific dataelement with some additional informations like timing of it's dataelement for specific sequence. In other words, one GFX means one dataelement with timing for one sequence.
The GFX Editor is used for modifying existing dataelements, creating new dataelements as well as timing the GFXs for Avid assets.
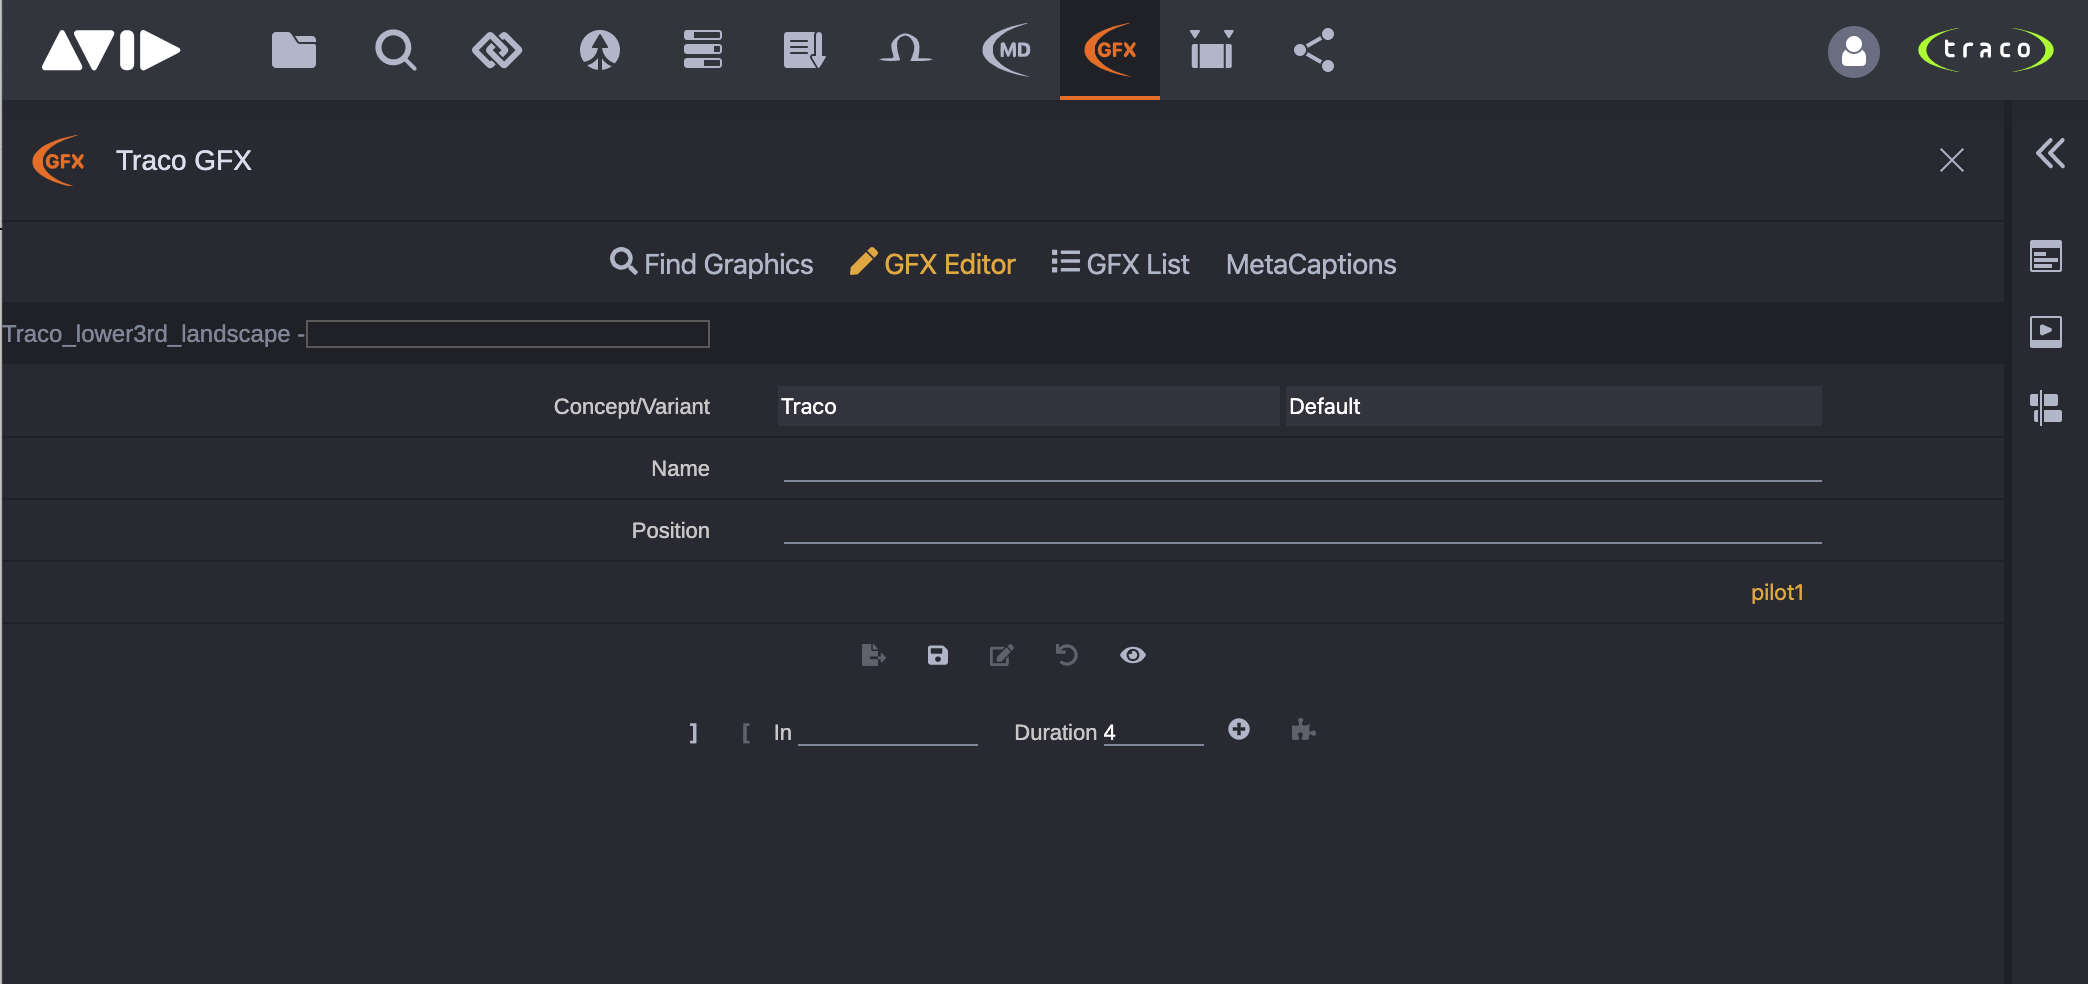
The first two fields of the GFX Editor are always the concept and variant selectboxes, while the remaining fields (rows) will be generated based on the created Viz template. If the template's scene has defined special named points, then those names will be displayed after the fields.
Working with Template Fields
Traco GFX supports several field types while each type can be controlled in it's own way.
Supported types:
- Text/plain
- Richtext
- Triplet
- Image (application/atom+xml;type=entry;media=image) from Viz Graphic Hub
- Geometry (application/vnd.vizrt.viz.geom) from Viz Graphic Hub
- Material (application/vnd.vizrt.viz.material) from Viz Graphic Hub
If other field types are required or fields do not display correctly, plase contact system administrators.
Template Fields Properties Modified in HTML Template Builder
If the VizRT environment contains Viz Pilot Edge installation with the HTML Template Builder, Traco GFX can inherit the behaviour of the fields defined in Template Builder, e. g. default field values, visibility of the field (HIDDEN property), etc. If the behaviour of the fields in Traco GFX differs from the behaviour in Pilot Edge, please contact system administrators.
If HTML iFrames are used in templates, Traco GFX is able to display them if all required communications ports are availbale from the clients' computers, however modifying the templates' original fields from the iFrame is not supported in the current version.
GFX Action Toolbar
Below the template fields a toolbar with several action buttons is located.
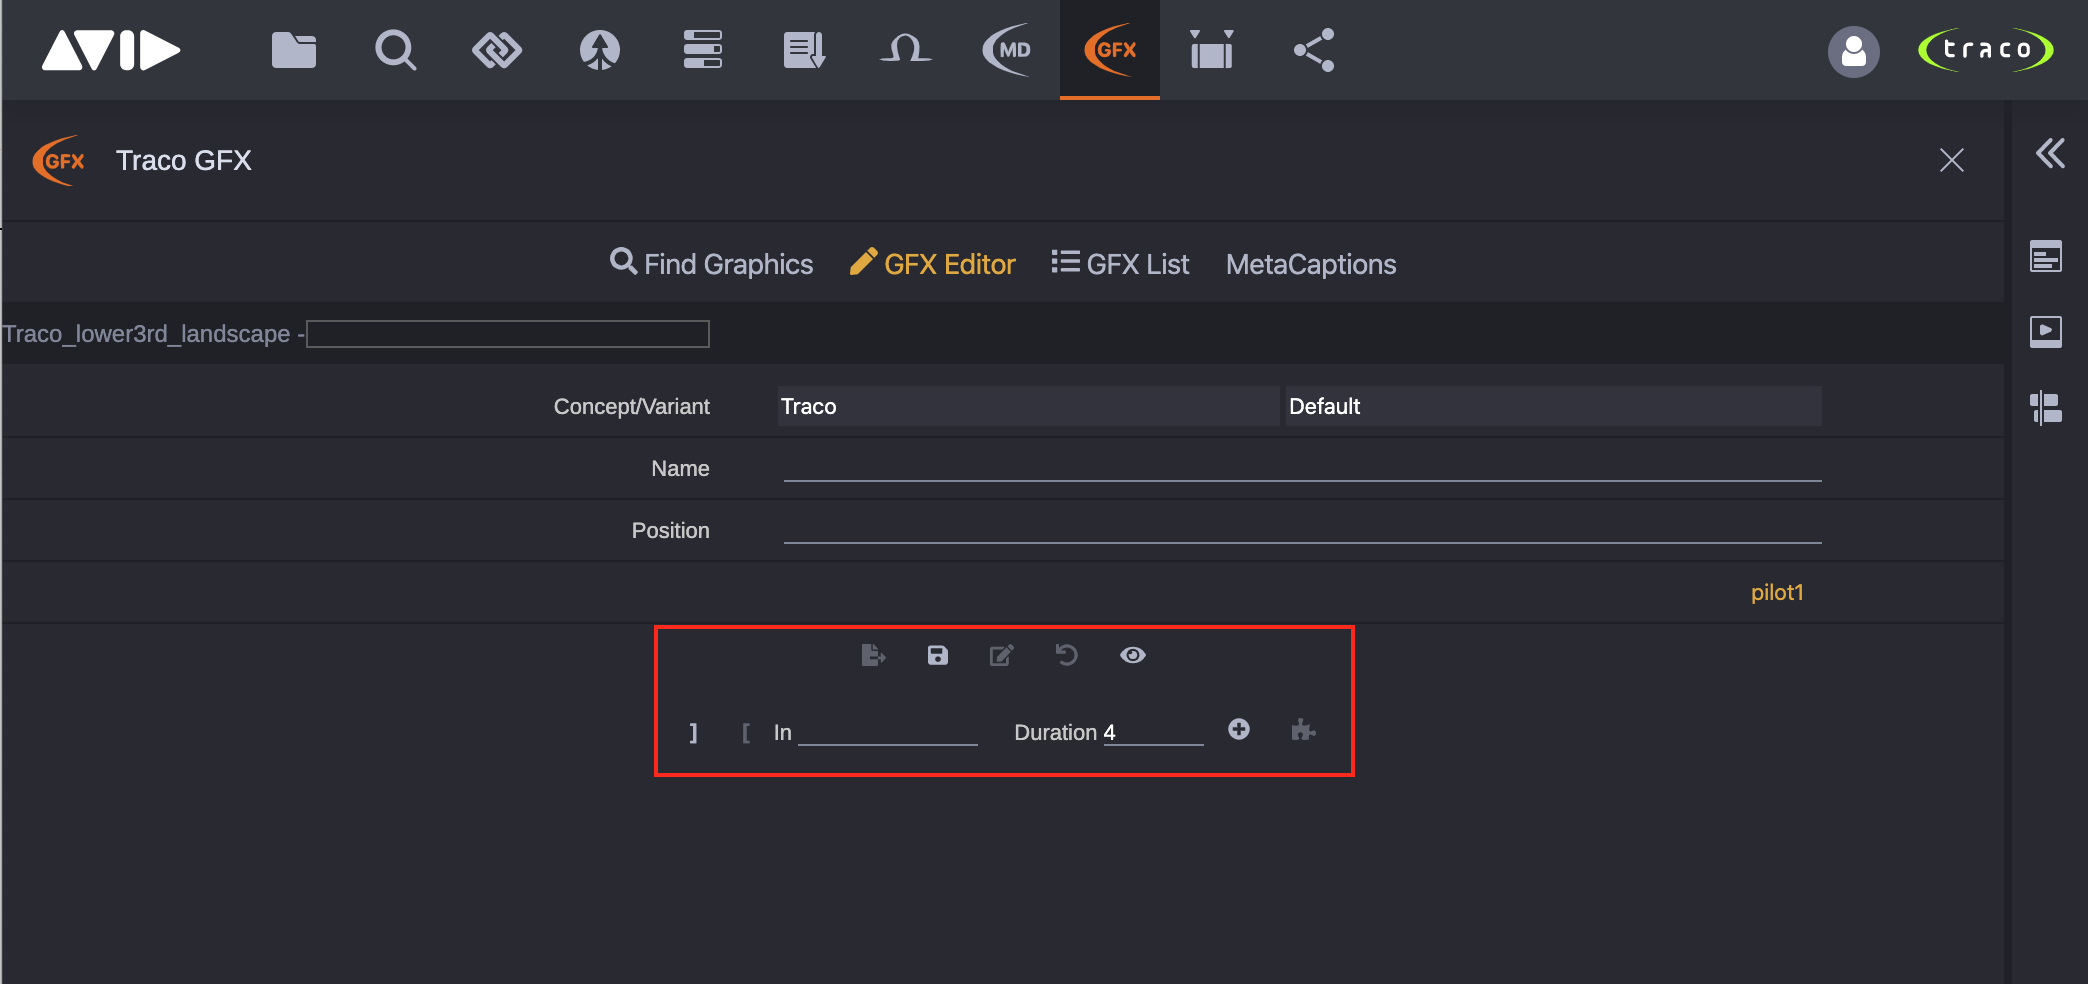
 : Save dataelement as new and create GFX with the default duration at current timecode (available only if a sequence is loaded into Traco GFX Timeline).
 : Save dataelement as new.
 : Save changes to the opened dataelement (available only if an existing dataelement was opened and it's fields were modified).
 : Revert changes made in dataetelemt's fields.
 : Display/Hide the GFX from the GFX Editor as an overlay image in the Cloud UX MediaPlayer. The preview will turn on automatically 1 second after editing a field in the GFX Editor. For more details about the GFX Preview see GFX Preview in MediaPlayer.
 : Set In / Out point of the gfx to current timecode (available only if a sequence is loaded into Traco GFX Timeline and the opened datelement has no local modifications).
- In: Manually input start timecode of the GFX.
- Duration: Set the default duration of the GFX which will be used when creating new GFX.
 : Create GFX with the default duration at current timecode (available only if a sequence is loaded into Traco GFX Timeline).
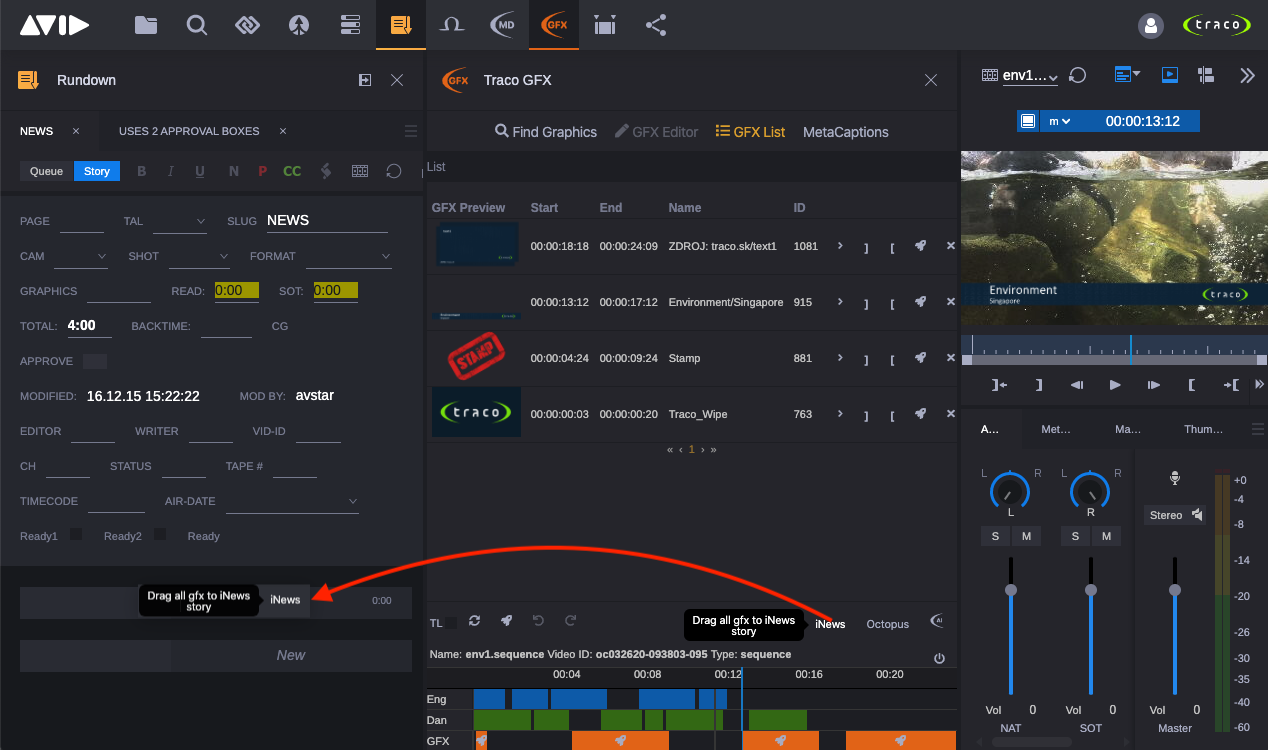
If the ALT button is pressed on the keyboard while clicking this button, actual timecode and default duration will be ignored, and the GFX will be created from the beginning of the sequence during it's whole duration. : Drag and dropping this button to a supported NRCS story's text (Octopus, iNews, etc.) will cause to create a new MOS object in the NRCS story from the currently opened GFX in the GFX editor (available only if the opened dataelement does not contain unsaved changes).
GFX Preview in MediaPlayer
Preview of the GFX image by default is created at the pilot1 named point (STOP or TAG) defined in the Viz scene. If pilot1 named point is not set in the scene, the GFX preview will be created at the point where the scene was closed last time. Not defining the pilot1 named point often leads to fully transparent GFX preview image, because scenes are often closed at the end of animations, when all graphics are dissolved. In this situation users may think the preview is not working, however, only a fully transperent preview image is displayed in the MediaPlayer.
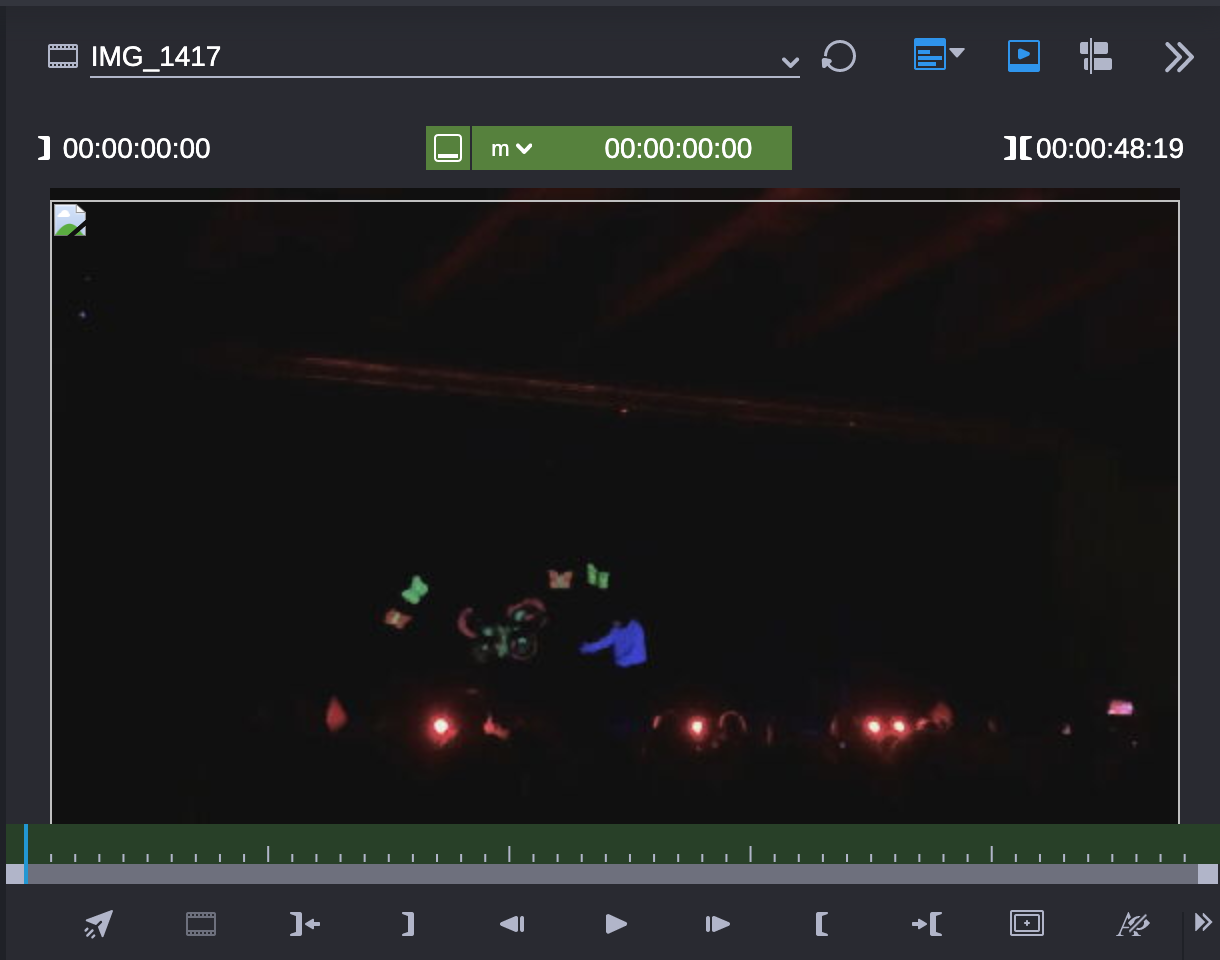
Traco GFX supports displaying GFX preview in MediaPlayer even if other asset is already loaded into it. If the preview image is not a full screen graphics and has alpha channel, then the preview will be visible over the asset with transparency.
If errors occure while creating the GFX preview, a broken image button will appear in the MediaPlayer.
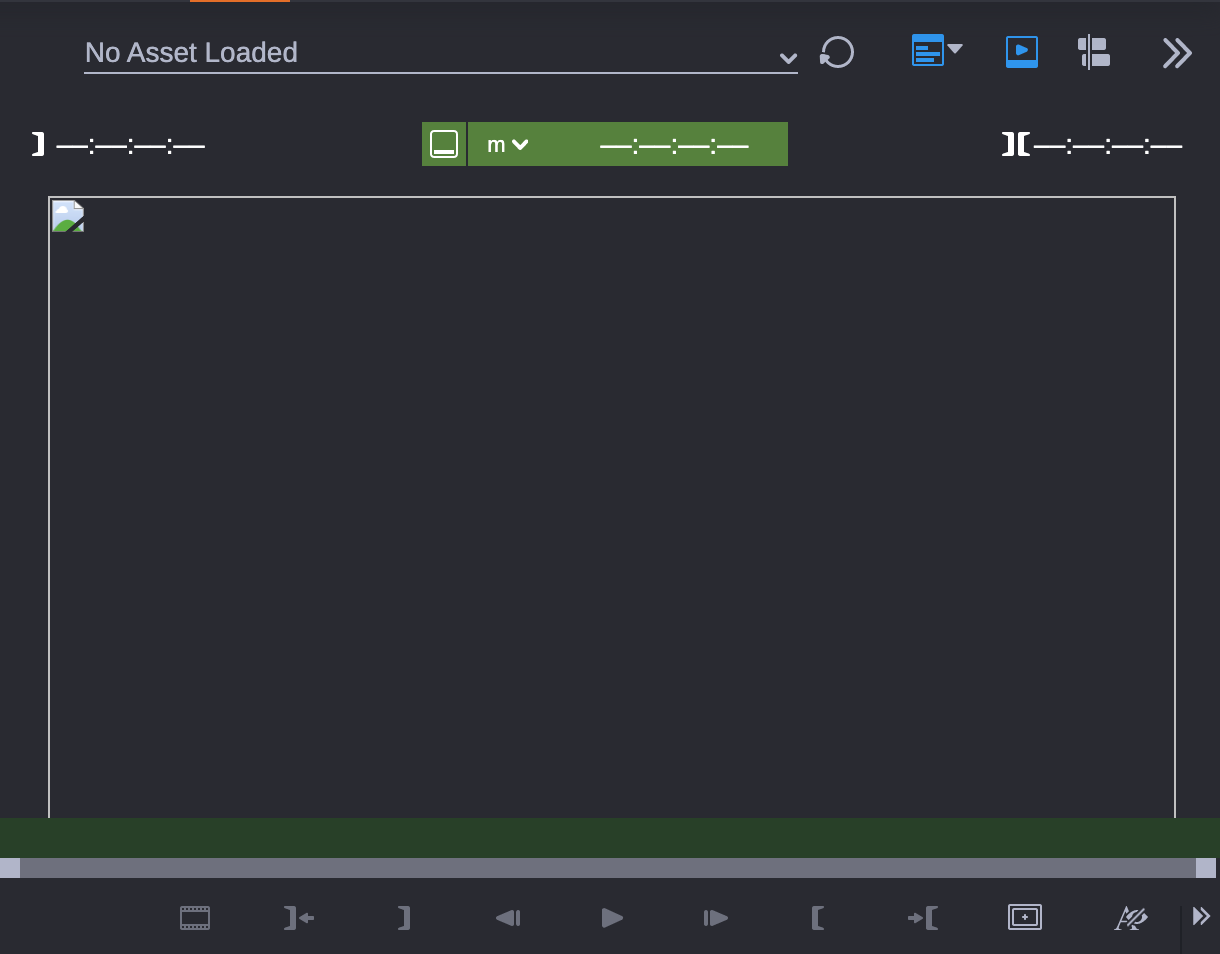 |
 |
Error messages and debug informations of the GFX preview are printed into the web browsers developer's console.
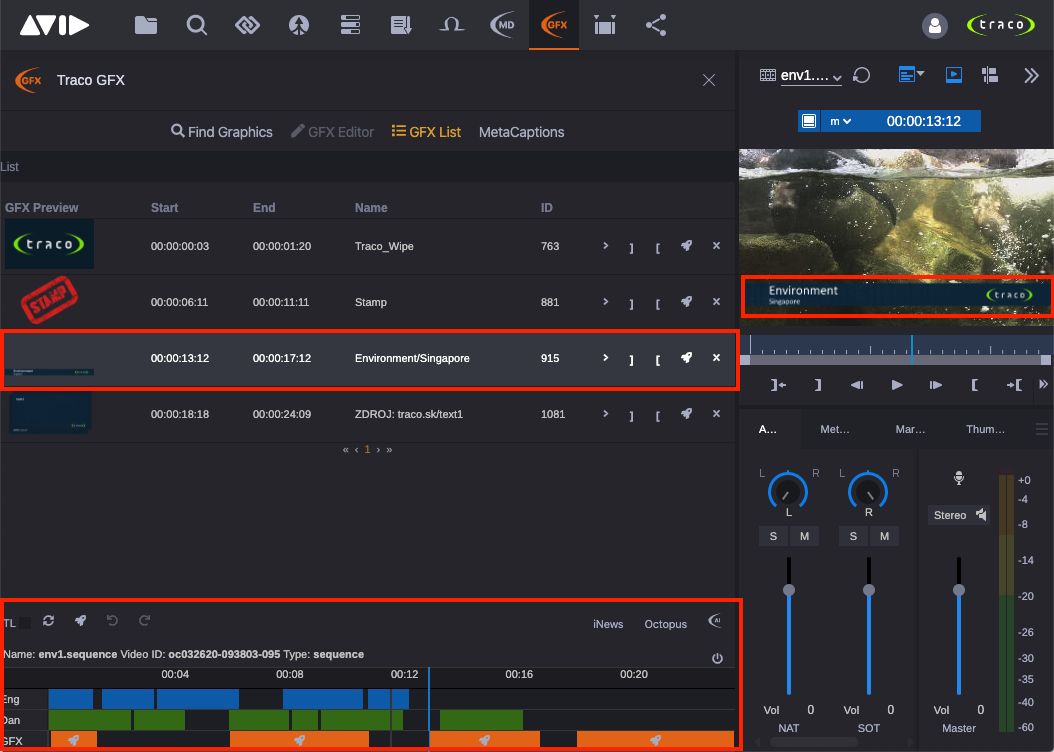
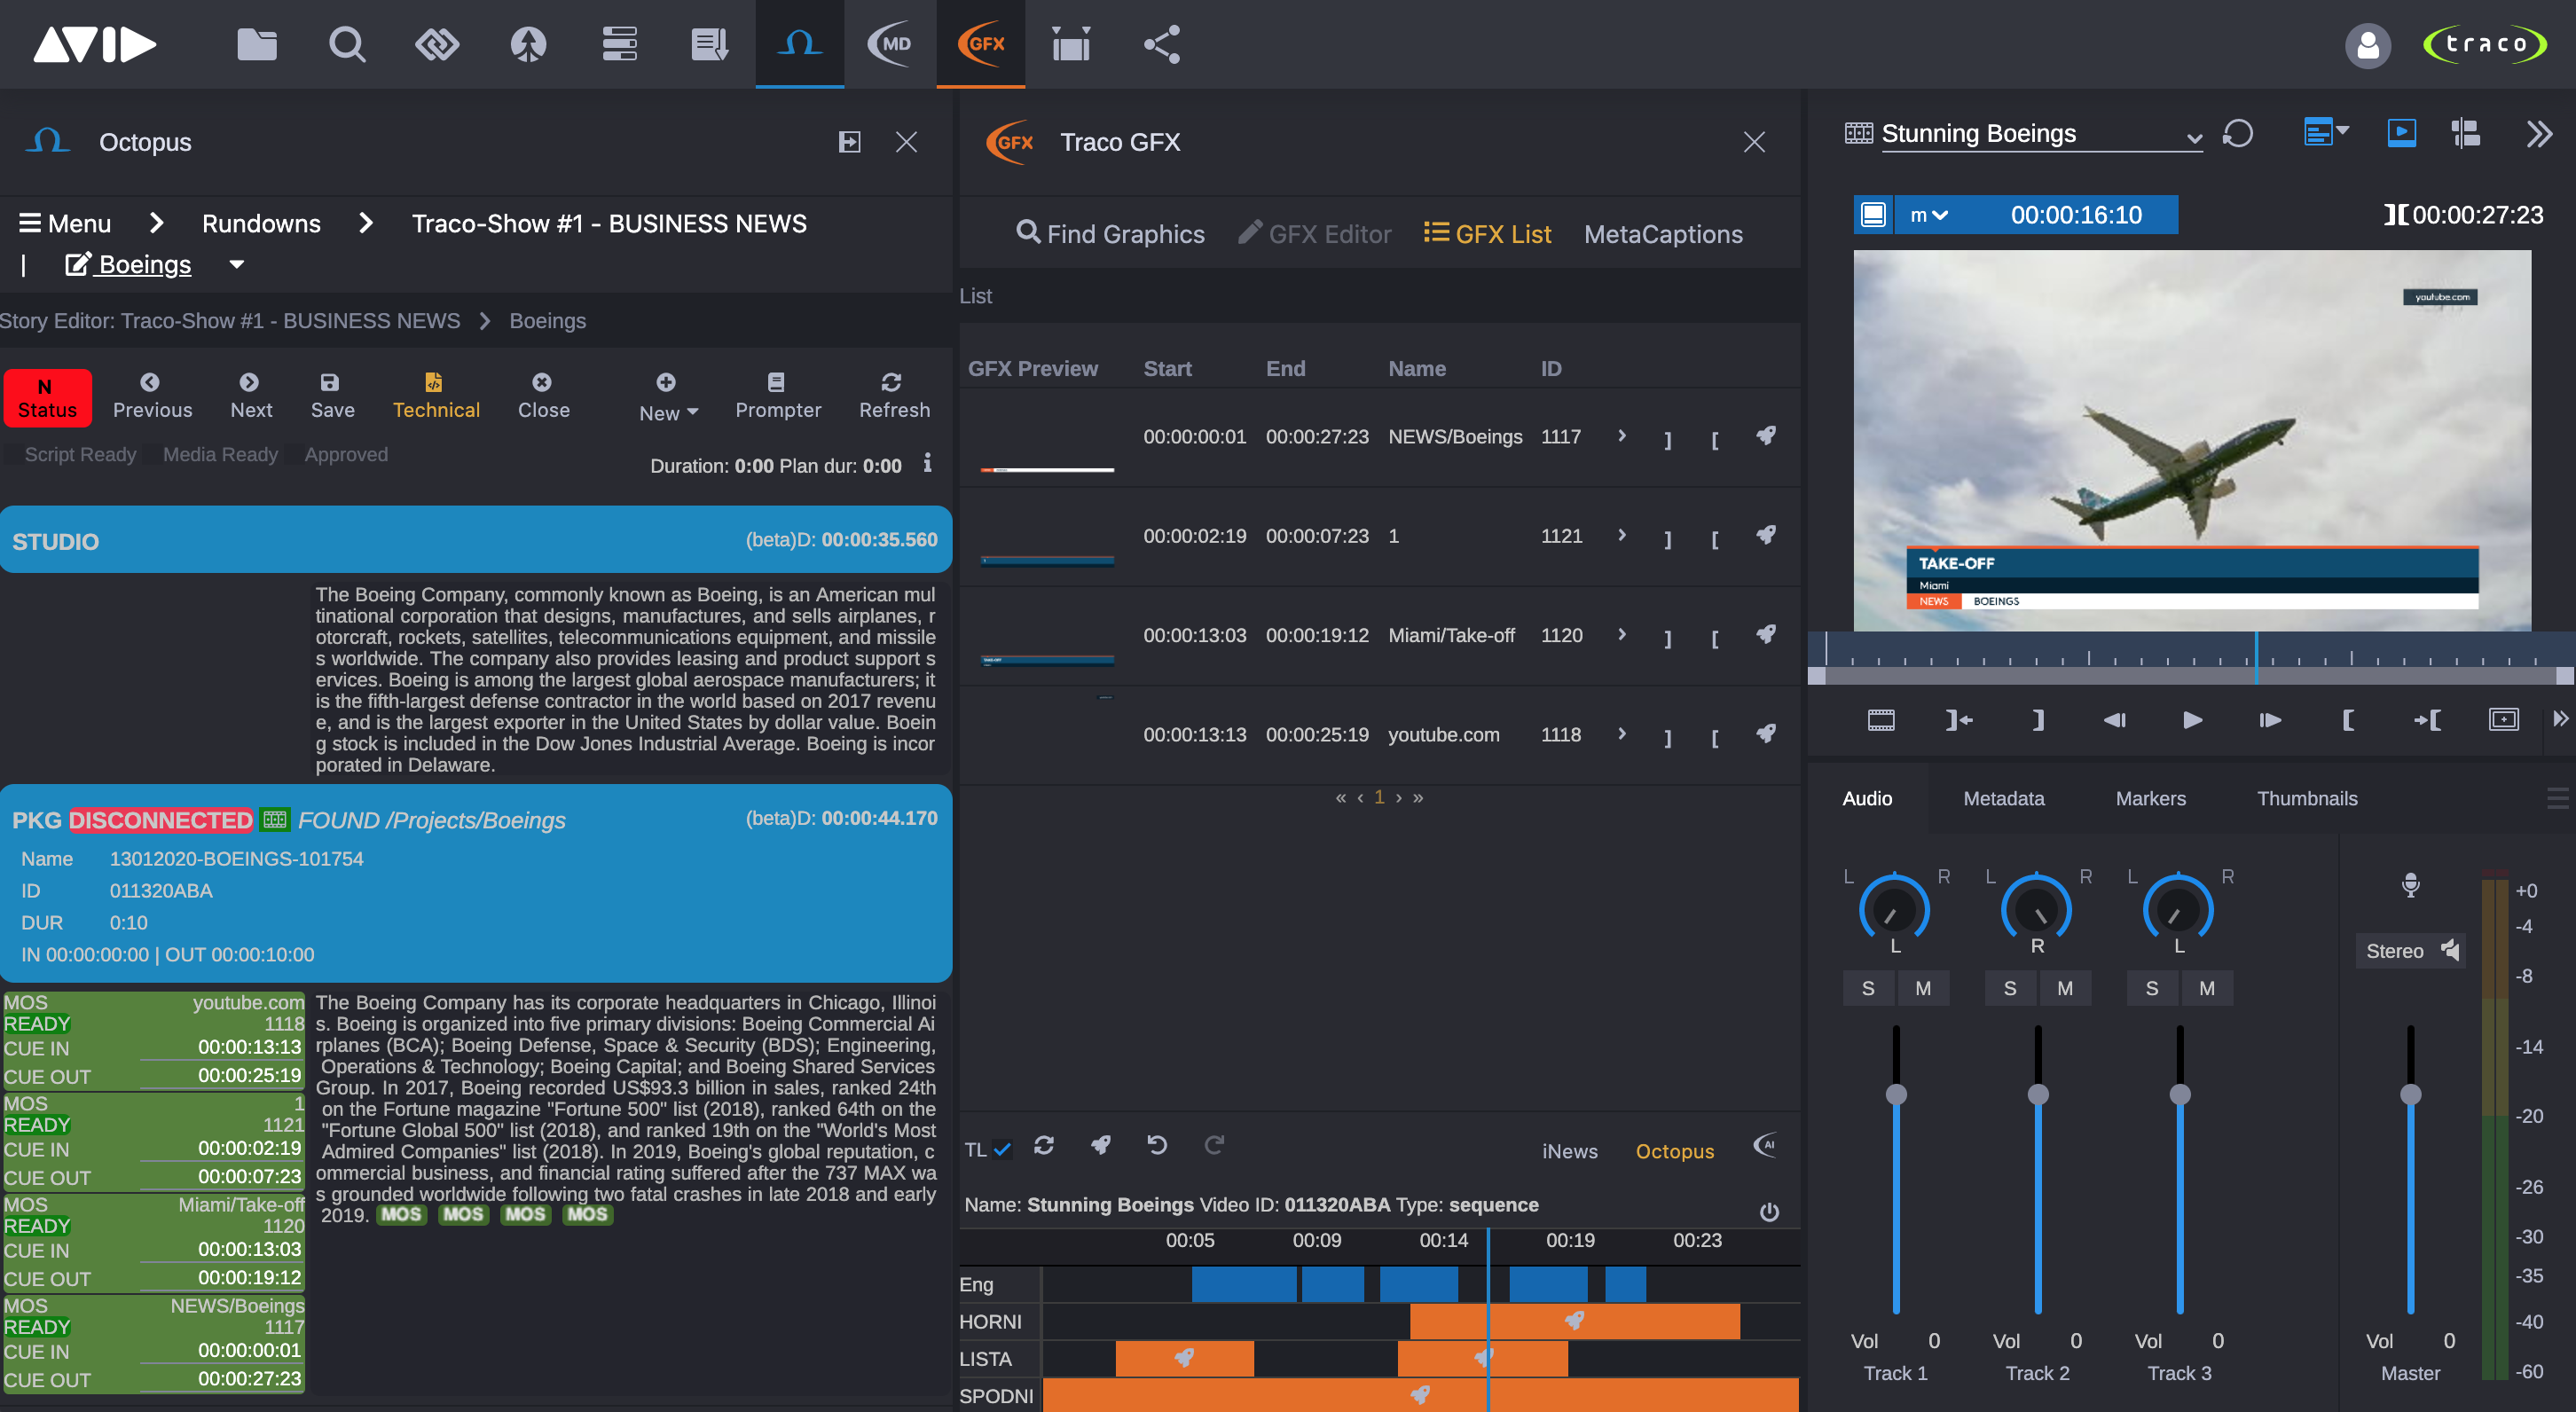
GFX List
GFX List page is available when a sequence is loaded into Traco GFX Timeline. This page contains a list of GFXs for the loaded sequence and allows to adjust their timing, render and remove them.
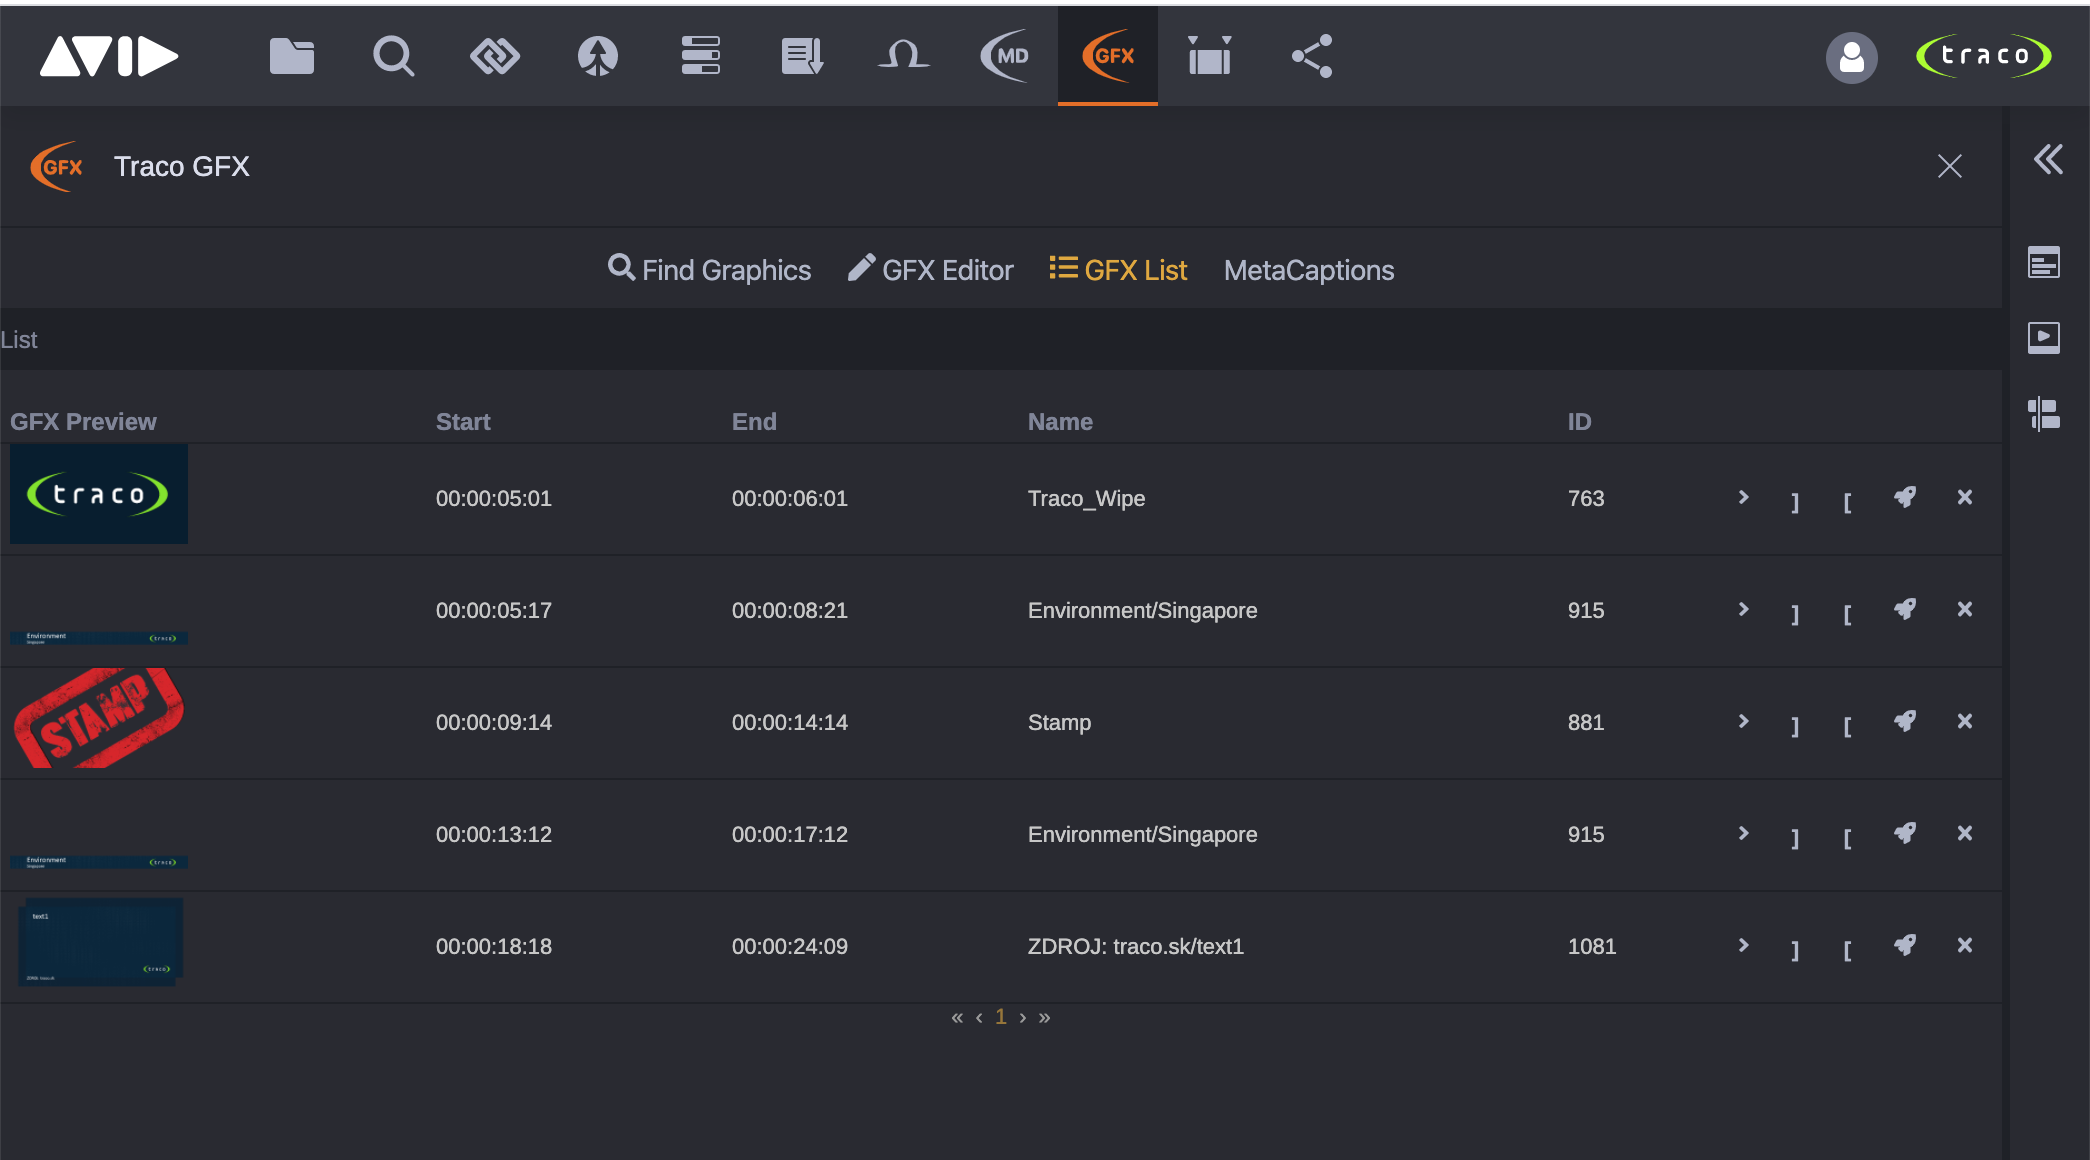
Every row in the list represents one GFX object with small preview image (if available), start and end timecode, GFX name (derived from the name of it's dataelement), ID of it's dataelement (provided by Viz Dataserver) and action buttons.
 : Set the player's timecode to the start timecode of the GFX.
 : Set In / Out point of the GFX to current timecode.
 : Render GFX animation (not available for all template types).
 : Delete the GFX.
Double clicking a row from the list will open the selected GFX in the GFX Editor page and makes it fully editable. If a GFX is opened in the GFX Editor, then in the GFX List it is always highlighted with orange color.
MetaCaptions
The MetaCaptions module of the Traco GFX app is for creating open and closed captions for sequecnces. Multiple MetaCaptioning profiles can be used, while each profile can have it's own style (position, font family, size, color, style, background, opacity, etc.). These profiles must be created and defined by system administrators.
While working with the MetaCaptions module, users are creating so-called MetaCaption segments for profiles. Each segment includes start time, end time and text. Segments can include additional information, like segment specific positioning and style, i. e. the position of a segment is defined globally in the MetaCaption profile, but users can adjust the positioning for each segment individually.

Toolbar

- Profile Selector: Dropdown menu for selecting the MetaCaptioning profile.
 : Import/Export MetaCaption to/from files. Supported file types: .srt.
 : Undo/Redo last modifications in any MetaCaptioning profile.
- Filter: Simple text filter.
- Show [10] segments: Number of segments displayed with paging.
Creating Segment
New segments can be created several ways, however it is necessary to have a sequence loaded into Traco GFX Timeline.
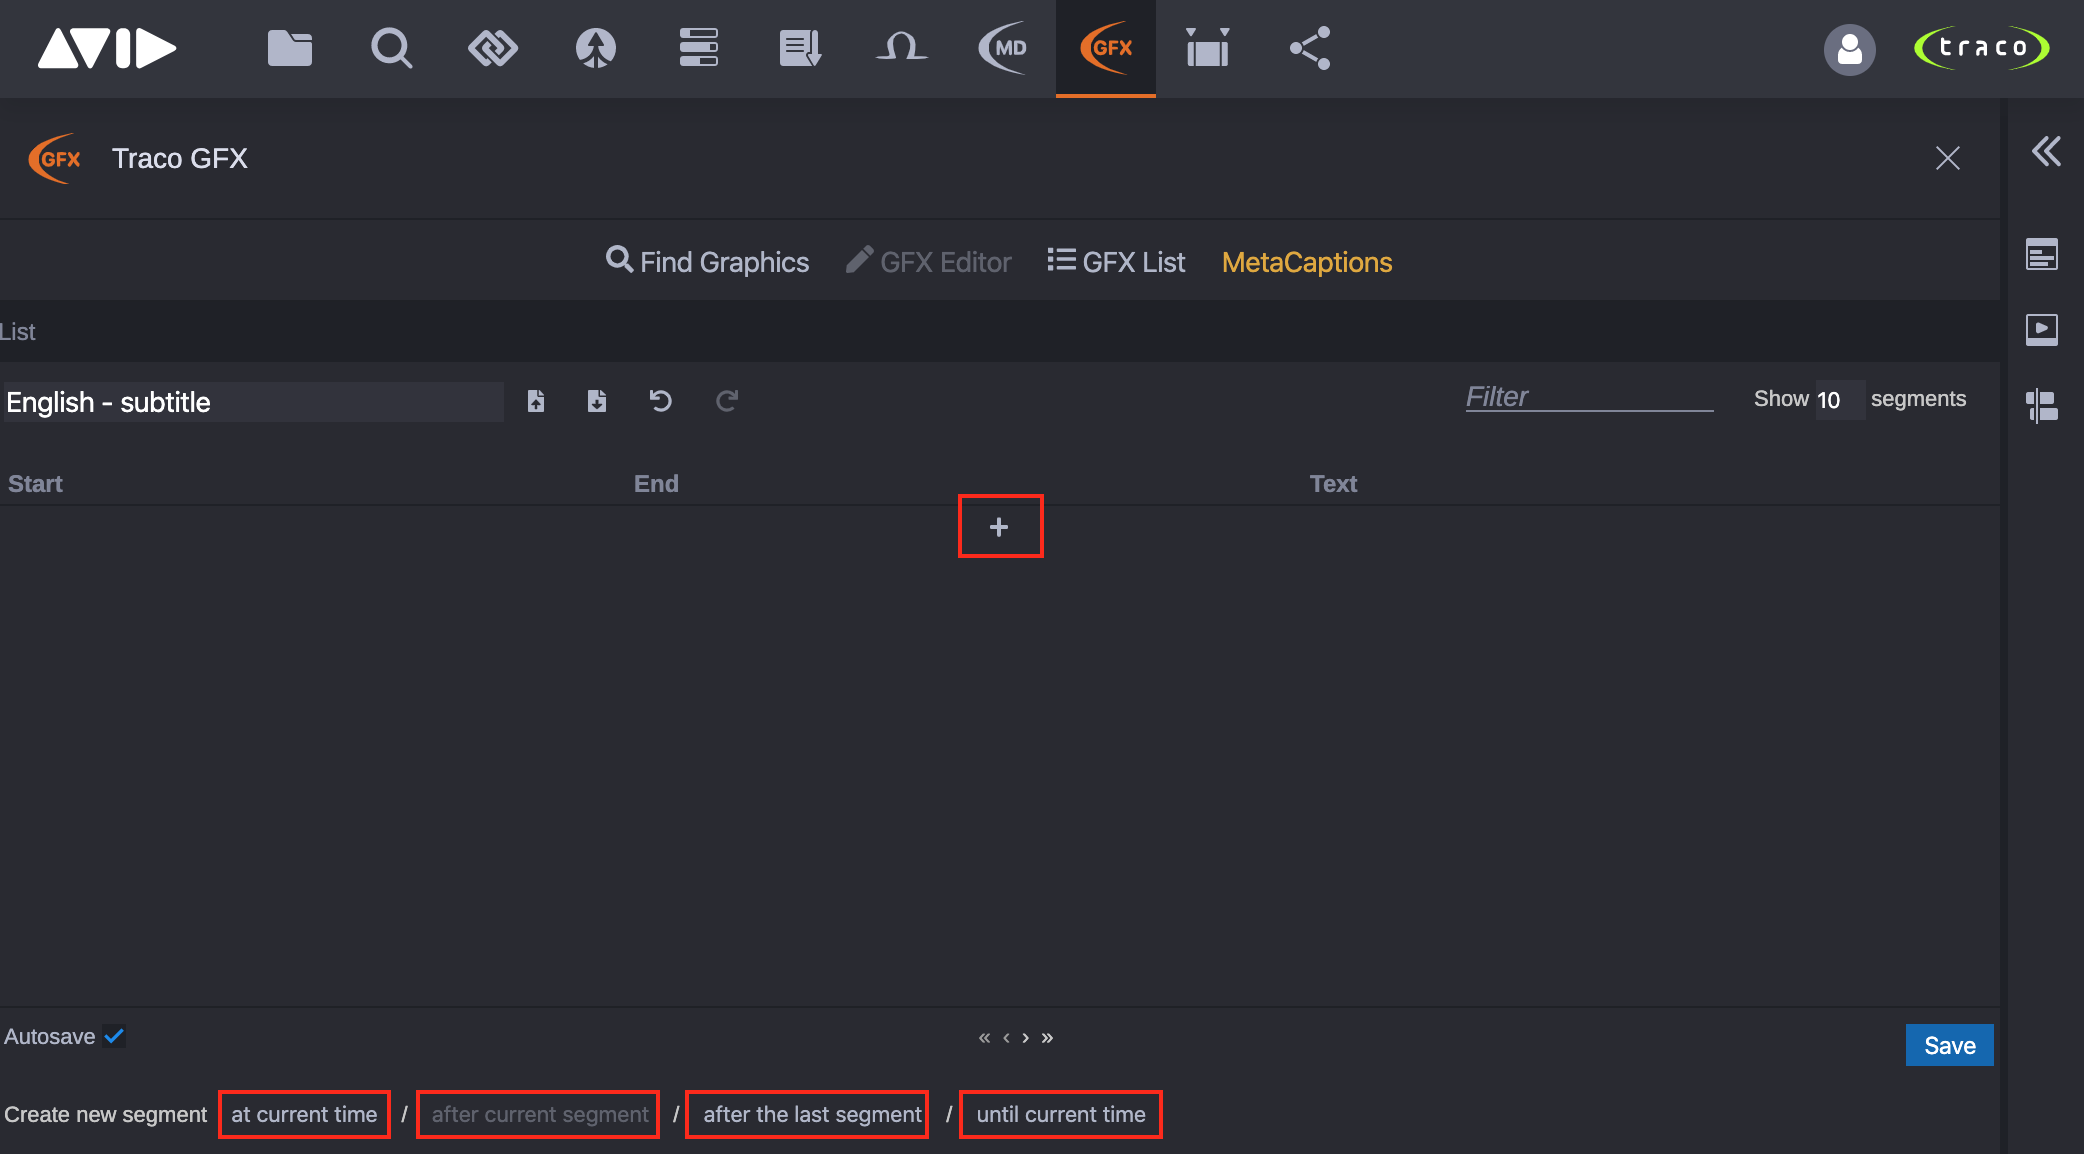
Creating new segment with the  button will create it based on some special rules taking into consideration the current timecode and other segments' position and length. Otherwise, buttons at the bottom of the app can be used to create segments based on users' decision.
Editing Segment
Created segments are visible and editable in the MetaCaptions page. Each segment has it's own row with own actions.

Start and end timecodes of segments are set automatically when creating a new segment, but they can be adjusted manully. By clicking into the start and end timecode fields of a segment, users can manually update them by typing, furthermore, hovering over the timecodes will display + and - buttons next to them to increase/decrease the selected value.

 : Play the segment in MediaPlayer from segment start to segment end.
 : Set start/end of segment timecode to actual timecode.
- Text: Text of the segment.
 : Override the segment's text position, which is set in the MetaCaption profile, i. e. move the segment's text up or down in the MediaPlayer.
 : Delete the segment.
Keyboard Shortcuts
Users can use keyboard shortcuts while working with MetaCaptions. These shortcuts are functional only when the focus (blinking mouse cursor) is in the text of a MetaCaption segment.
| Shortcut | Description |
|---|---|
| Tabulator | Play the opened asset in the MediaPlayer from the start timecode of the focused segment. If the media is already being played, it will pause the playing and set the focus to the nearest segment. |
| ALT + Left Arrow | If the playing is paused, it will set the current timecode as the start timecode of the currently focused segment. |
| ALT + Right Arrow | If the playing is paused, it will set the current timecode as the end timecode of the currently focused segment. |
| ALT + Down Arrow | Decrease the start timecode of the currently focused segment. |
| ALT + Up Arrow | Increase the start timecode of the currently focused segment. |
| Down Arrow | If the cursor is at the end of the last segment’s text, it will create a new segment after it, while if the segment is not the last segment, it will set the focus to the next segment. |
| Up Arrow | If the cursor is at the beginning of a segment it will set the focus to the previous segment. |
Segment Preview in MediaPlayer
Segment's text with the exact styling is visible as on overlay in the MediaPlayer if the actual timecode of the MediaPlayer is within the interval of the segment's start and end timecode. Double clicking a segment row will set the timecode of the MediaPlayer to the start timecode of the segment.
Saving Changes
By default all MetaCaption data are saved every 30 seconds, but the changes can be saved anytime by clicking the Save button at the bottom right corner of the MetaCaptions page.
The autosave feature can be turned off by unchecking the Autosave checkbox at the bottom left corner of the MetaCaptions page, however this feature will be enabled again if the user closes the Traco GFX app, refreshes the Cloud UX page or just signs out.
Traco GFX Timeline
The Traco GFX app contains a "Traco GFX Timeline" at the bottom of the app which is derived from the Cloud UX Timeline with limited functionality. The main purpose of the Traco GFX Timeline is to visualize the graphical objects over the sequence, which were created by Traco GFX. Traco GFX Timeline provides basic functionality for edting these objects, like resizing, controlling and deleting. The Traco GFX Timeline is exclusively designated for working with graphical objects, while sequence editing is not allowed.
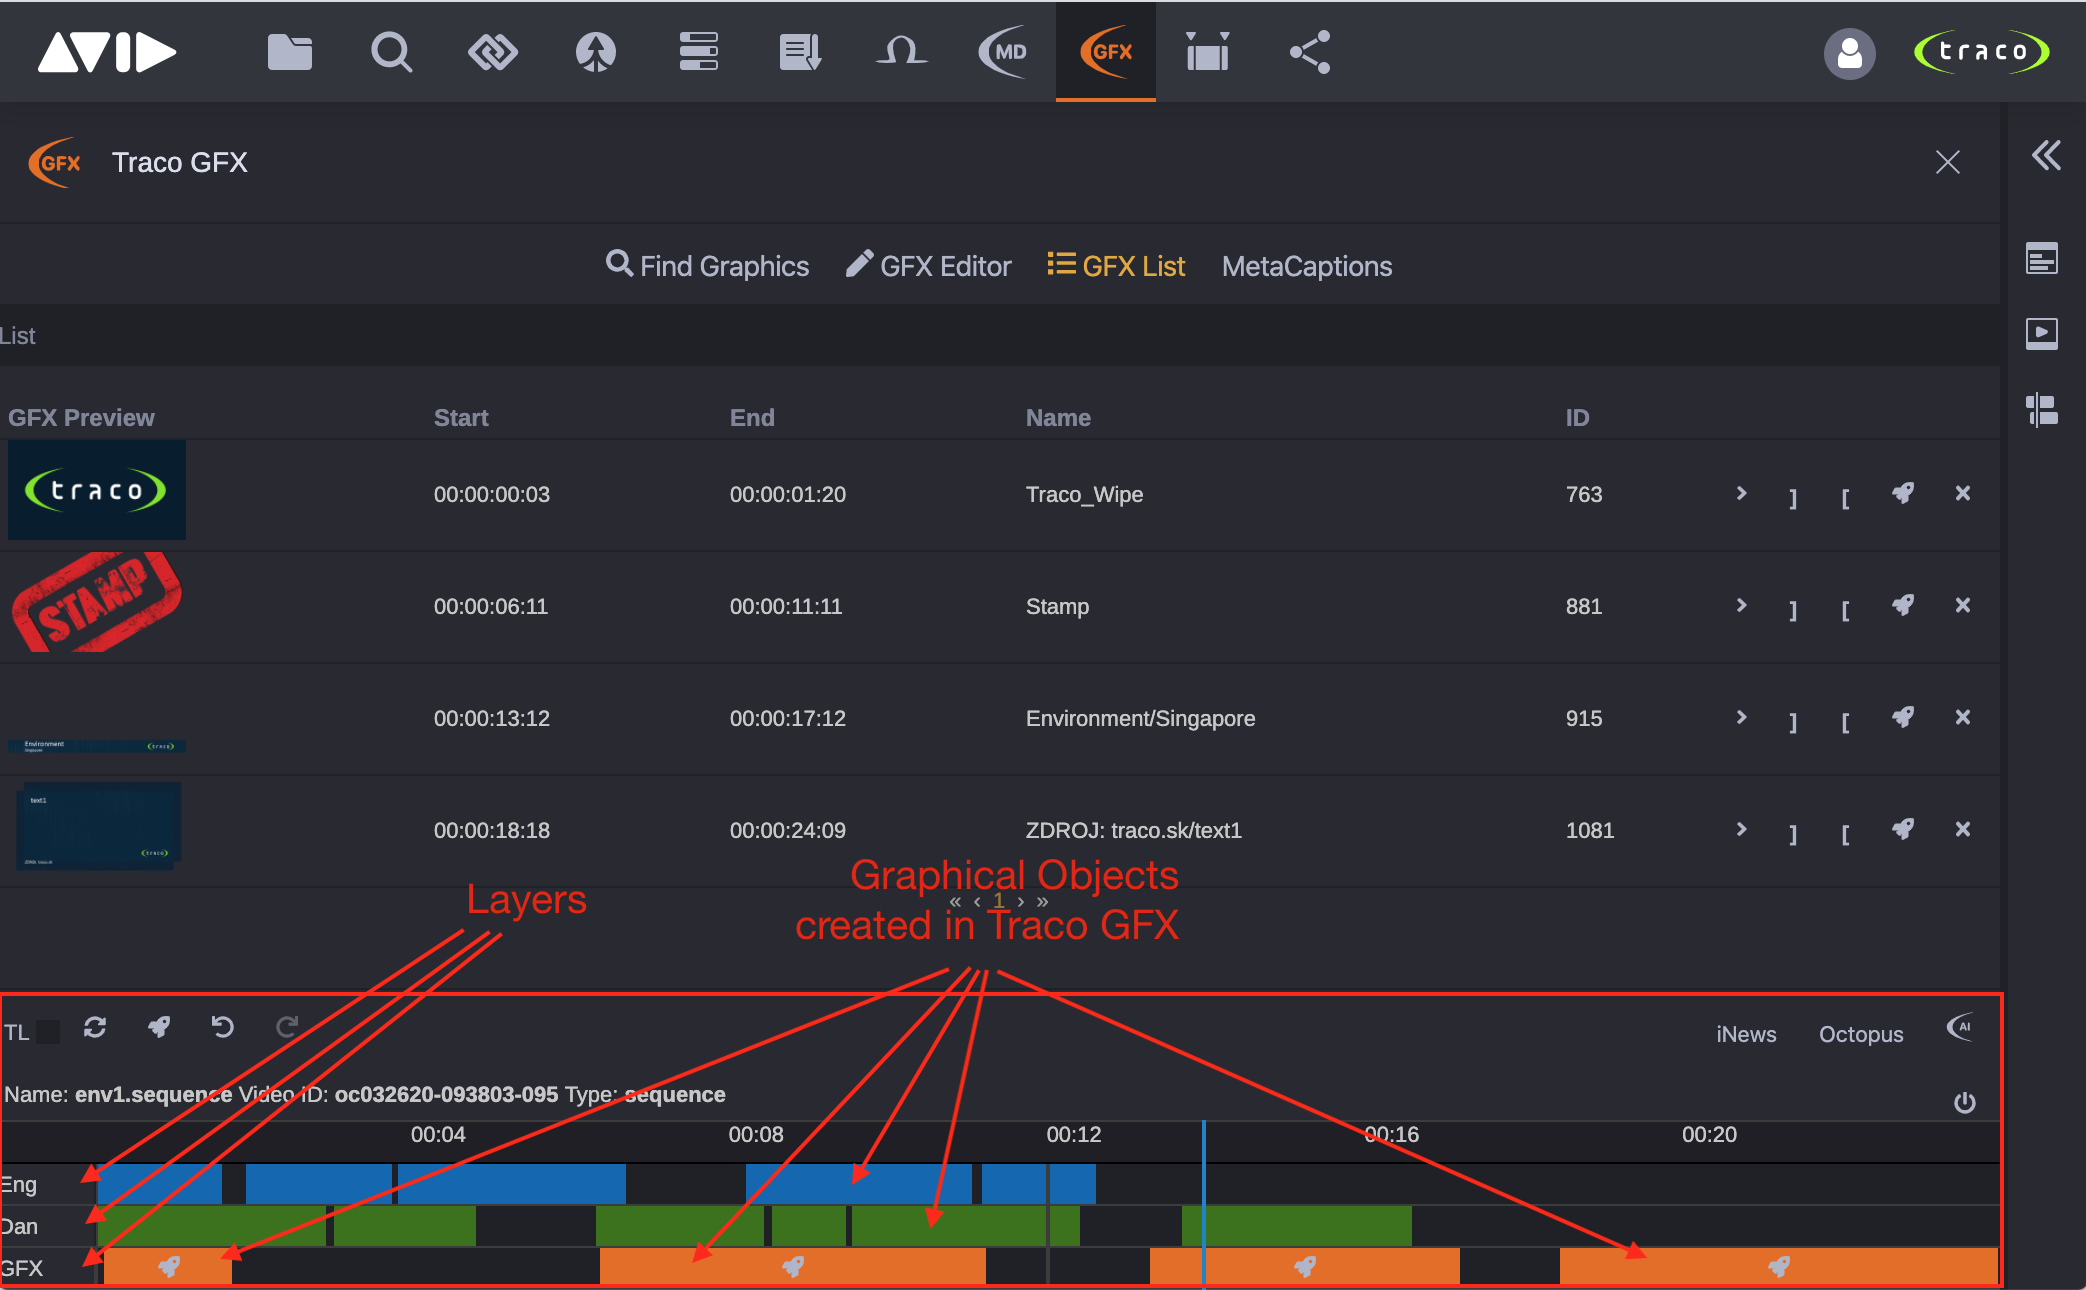
The Traco GFX Timeline is able to work with unspecified number of graphical layers, while each layer is beeing generated and added automatically based on the used graphical object types.
The layers for GFXs are always the lowermost, visualized with orange graphical segments. Above the GFX layers there are the MetaCaption layers. Each MetaCaption profile has it's own layer generated in the Traco GFX Timeline when the first MetaCaption segment of the given profile is added to the sequence. If a MetaCaption profile has no segments for the loaded sequence, it's layer is not visible. Furthermore, if all segments were removed from a MetaCaption profile, the layer is automatically removed from the Traco GFX Timeline.
To start working with GFXs and MetaCaption segments for Avid sequences, the given sequence must be loaded into Traco GFX Timeline. Users can check the loaded sequence's Name, Video ID and Type in the Traco GFX Timeline.

In case of Traco GFX Timeline has no sequence loaded, the whole timeline area is shaded.
Loading Sequence into Traco GFX Timeline
In most cases, sequences opened from Cloud UX apps, like Browse, Search, Rundown, Octopus, etc., are automatically loaded into the Traco GFX Timeline also. However, sometimes the Traco GFX Timeline is not able to autoload the sequence, usually when the Traco GFX app is opened in the docked area of the Cloud UX. In that case, the sequence needs to be manually loaded into the Traco GFX Timeline by a drag and drop operation from any Cloud UX app.
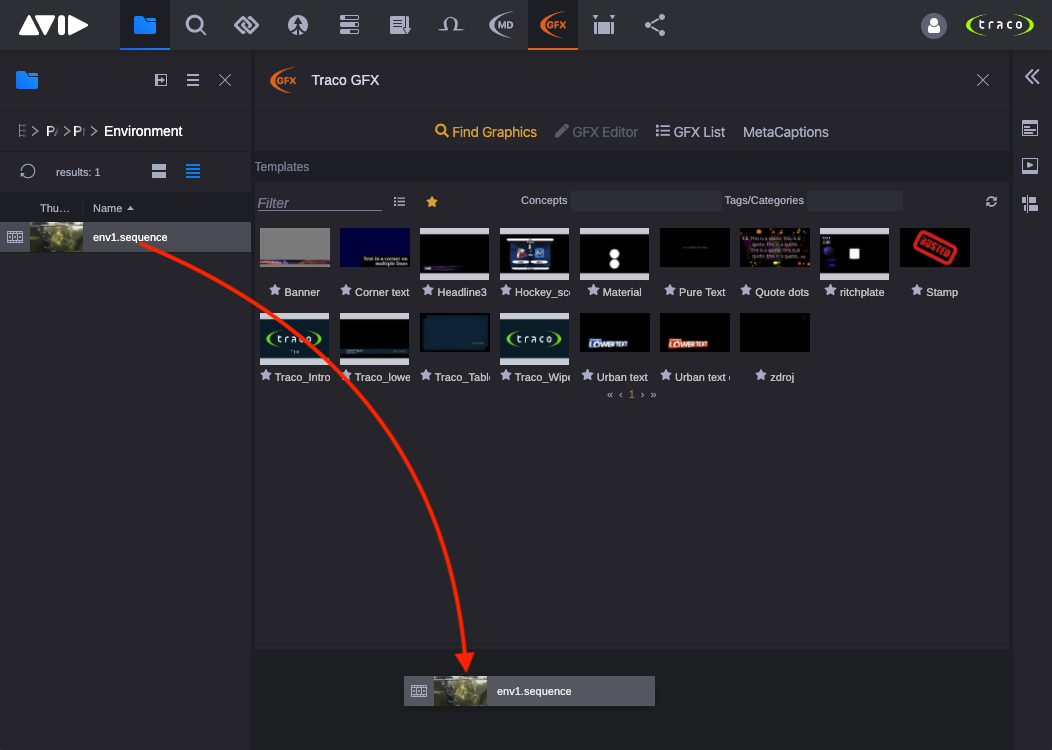
If a sequence is already loaded into the Traco GFX Timeline and users want to load another sequence into it, they can load the new sequence with the same drag and drop operation from any Cloud UX app.
Working with Traco GFX Timeline Graphical Objects
IMPORTANT! Before a user starts working with graphical objects over a sequecne, he must be sure, that the correct sequence is loaded into the Traco GFX Timeline. The best way for this is to compare the sequence's Name and Video ID from the Traco GFX Timeline with the asset opened in the Asset Inspector (Cloud UX MediaPlayer).
Thanks to Traco GFX Timeline, graphical objects' preview created by Traco GFX can be displayed in proper time intervals over the video in the MediaPlayer. By default, all graphical objects' preview is displayed as a statical image, however in most of the cases the whole animation preview can be fully rendered using the Traco GFX app to make the fade in and out absolutely frame accurate.
List of Actions
- Single click -> Set the timecode of the MediaPlayer to the start time of the graphical object and display it's preview as on overlay image. If a MetaCaption segment was clicked and the MetaCaptions page is opened, it will set the focus to the clicked segment's text.
- Double click -> Set the timecode of the MediaPlayer to the start time of the graphical object and display it's preview as on overlay image, furthermore open the clicked graphical object in the GFX Editor for editing (available only for GFX).
- Resize left and right edges -> Change the start and end timecodes of the graphical objects (available only for GFX).
- Single click while holding Alt key + mousemove -> Reposition the graphical object in timeline layer while not changing it's duration (available only for GFX).
- Hovering over a graphical object will display a small x button at the upper right corner of it -> Remove the timed graphical object from the sequence (available only for GFX). This action will not delete the dataelement from the Viz Pilot database.
 -> Render the graphical object (available only for GFX and only if rendering is enabled by administrators).
Viz Transition Logic
Traco GFX supports Viz templates with transition logic (TL). From the user point of view using this feature does not require additional knowledge about this behaviour, because the Traco GFX Timeline can detect if TL should be used or not for each sequence. If TL is detected in a Viz Pilot dataelement, then the default GFX layer will be overriden with the necessary number of layers. Each GFX layer will have it's name derived from the names of the used scenes' layers defined in the Viz Artist. If multiple scenes with multiple layers are used in a template, then an equivalent number of layers will be automatically created in the Traco GFX Timeline when a GFX of that template is created for a sequence. The GFXs created in this way will be added to all their layers of the Traco GFX Timeline. E. g.: if a GFX was created from a template which is using Viz layerA and layerB, then the GFX will be displayed in both layers. If the Traco GFX Timeline contains additional GFX layers (layerC, layerD, etc.) which are not used in the template, then the GFX will be NOT ADDED to that layer.

IMPORTANT! Do not create GFXs with transition logic and also non-tranistion logic templates' dataelements for one sequence. This may lead to improper timing, rendering, visualization and playout!
Traco GFX Postrenderer
As mentioned earlier in this document, when creating graphical objects for sequences in Traco GFX, does not modify the source media files. They are just displayed in the MediaPlayer as a preview. However, Traco GFX provides post-renderer engines (Traco MediaRenderer) and distributor services (Traco MediaDistributor Service) for burning and distributing the medias with burned graphics or in case of MetaCaptions medias with attached subtitle files.
After creating graphical objects (GFXs and MetaCaptions) in Traco GFX, users can export medias from the Avid environment, burn the GFXs and MetaCaptions into the exported media file and attach subtitles in separate files. Furthermore, the exported media file with burned graphics can be transcoded to multiple media formats. After the post-rendering process, the final media file can be automatically published (distributed) to multiple distribution targets, like social media platforms (Facebook, Youtube, Twitter, ...), playout servers (Airspeed, Fastserve, ...), custom FTP servers or any local or remote CMS. All these action can be triggered with a single Send button from the Cloud UX user interface. For details and settings, please see the Traco MediaDistributor documentaions.
Integrations with MOS based systems
Furthermore the post-rendering workflow, Traco GFX also supports MOS based workflows. The main purpose of the MOS workflow is to create production cues in NRCS stories which include graphical object id (in case of Viz Pilot it is the dataelement id) with their timing (cue in and cue out). A production cue can be created in any kind of MOS based system which is supporting the MOS HTML5 drag and drop operation. For details see the GFX Editor chapter of this document or continue to the next chapters of this document for specific systems.
IMPORTANT! MOS workflow is NOT supported with Traco MetaCaptions. Only GFXs from Viz Pilot objects are supported!
Octopus
If the Cloud UX environment contains installation of the Octopus app, Traco GFX can create GFXs directly in Octopus stories or assign existing Avid sequences with GFXs to Octopus storyelements with their Video ID.
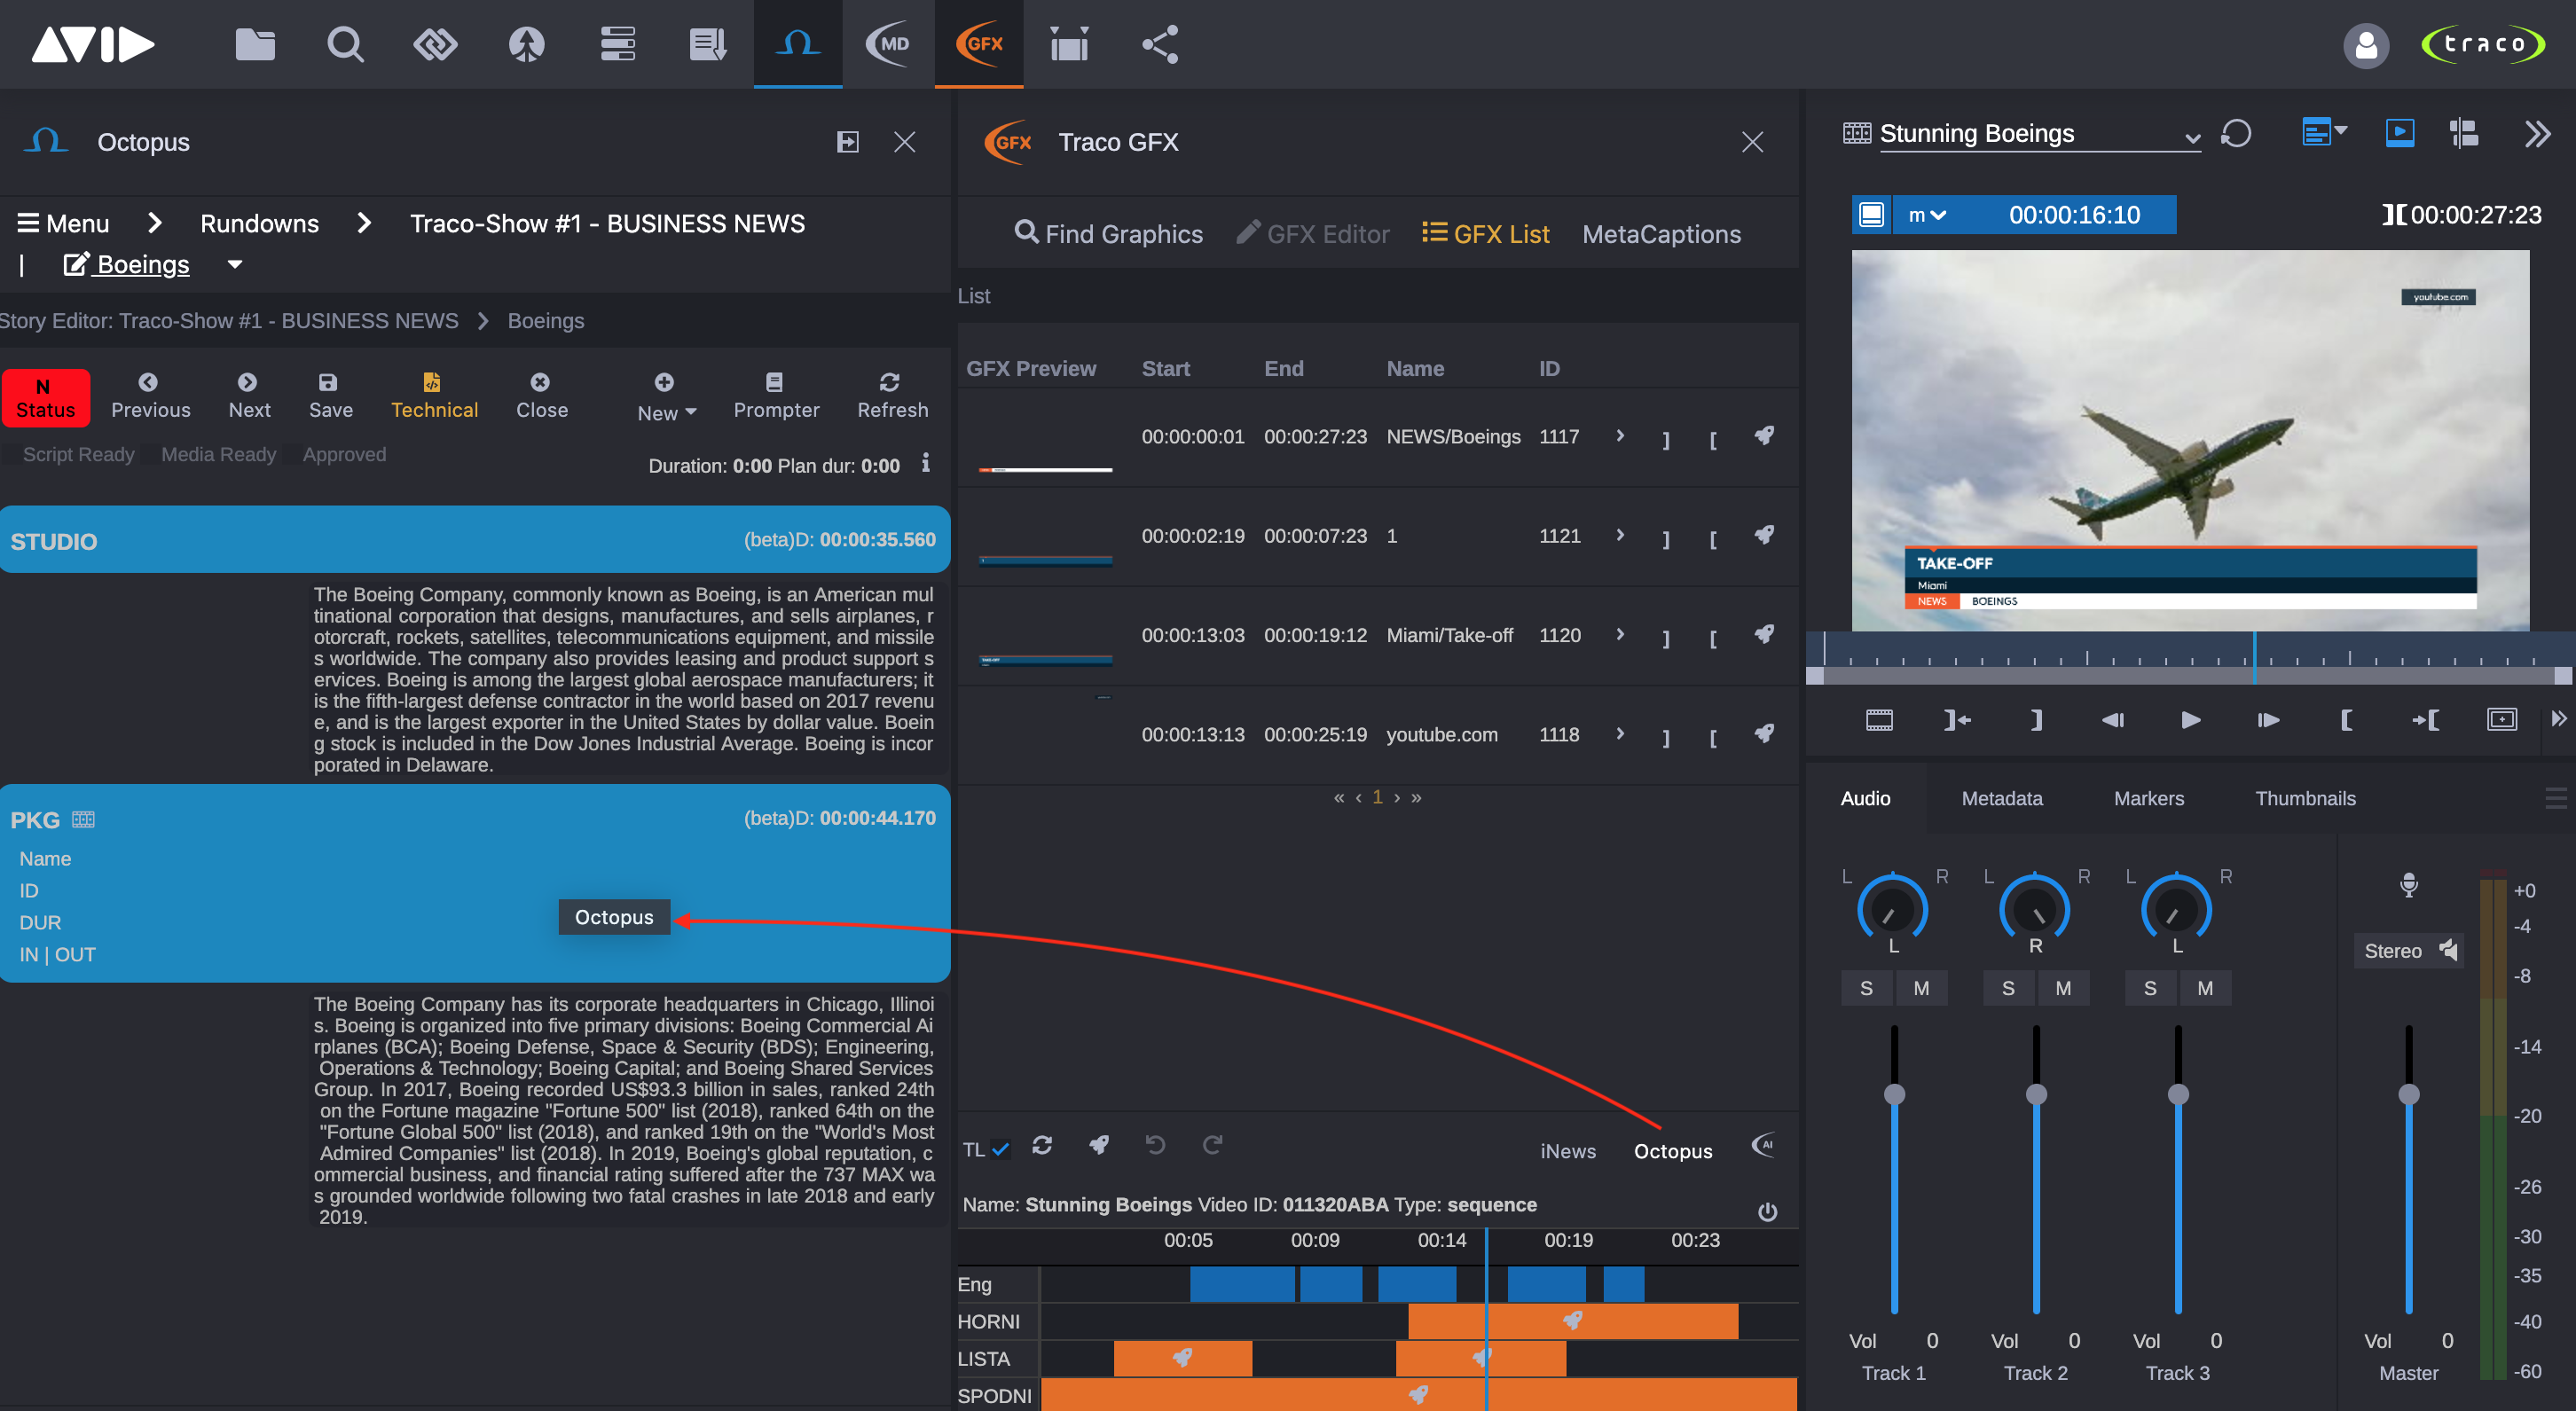
Recommanded App Layout in Cloud UX
When integrating Octopus app with Traco GFX, we recommend opening the Octopus app in the Cloud UX docked area while the Traco GFX in the main area.
Working with MOS Objects
Integration between Octopus and Traco GFX is handled by automatic synchronization. This means, when a GFX is created, modified or deleted for a sequence, then in the appropriate Octopus story a MOS object is also automatically created, modified or deleted. Furthermore, if the changes happen in a Octopus story, the changes will be automatically synchronized back to Traco GFX. To achieve this functionality there must be an active synchronization enabled between Traco GFX and Octopus. The easiest way to enable this synchronization is to follow the next steps every time when users start working with Octopus and Traco GFX:
- Open Octopus app in the docked (left) area of the Cloud UX.
- Open Traco GFX in the main area of the Cloud UX (see recommended layout).
- Open a story in the Octopus app.
- Open a clip from the Octopus story with the storyelement's sequence button (see deatils in Octopus documentations).
Completing the above steps the two way synchronization will be turned on automatically. When the synchronization is turned on, the Octopus button above the Traco GFX Timeline will be shown with orange color.
 IMPORTANT! The synchronization can be active only if both the Octopus and the Traco GFX apps are open.
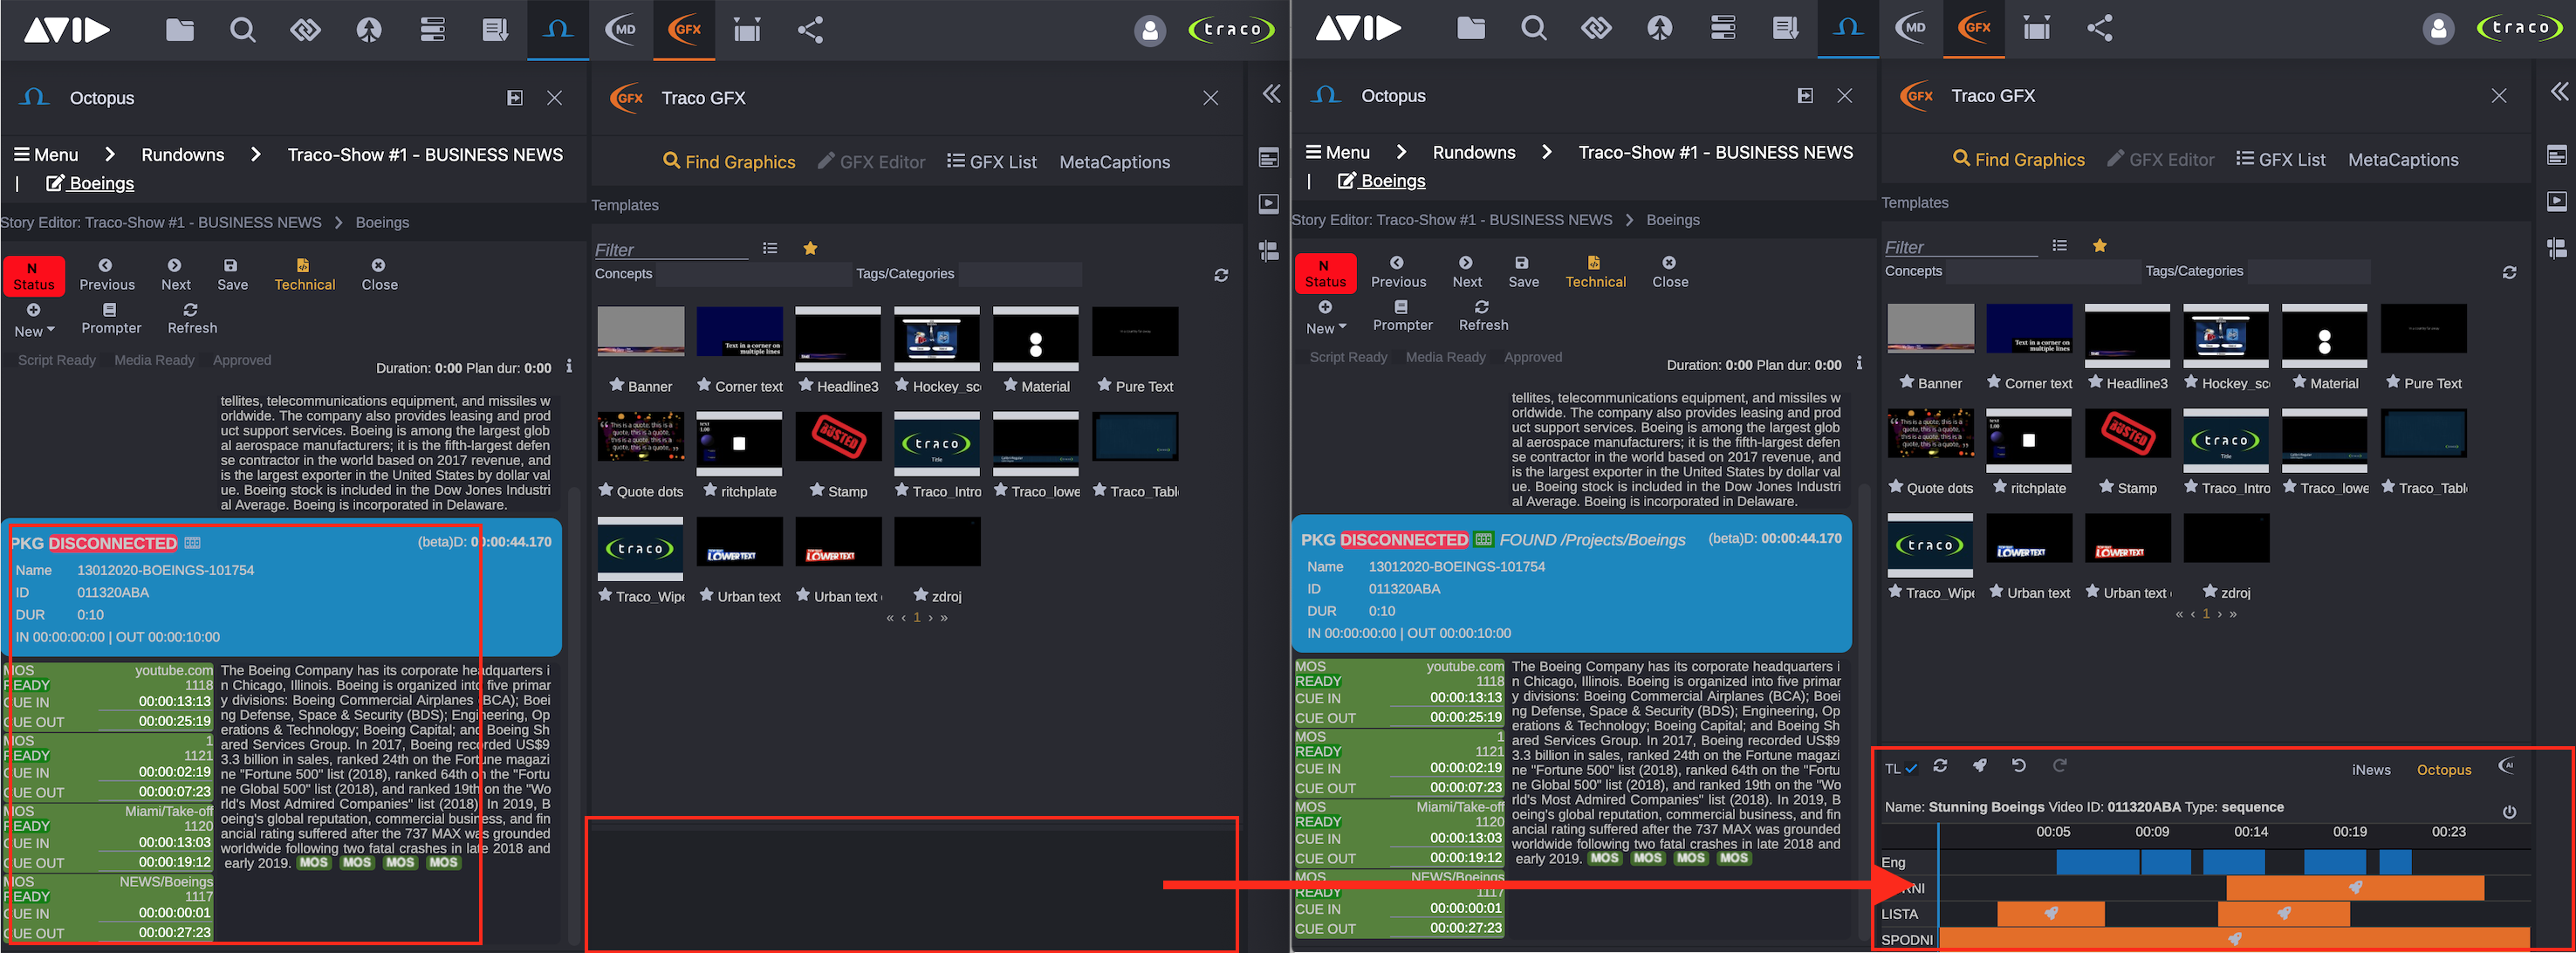
Assigning Avid Sequence with GFXs to Storyelement
If users start creating GFXs without an opened Octopus story, they can later assign the sequence with GFXs to any story with a single drag and drop operation. The drag and drop operation will set the sequence's Video ID for the Octopus story's clip and add MOS objects to story based on the GFXs. If the used sequence does not have a Video ID during this drag and drop operation, then a unique Video ID will be automatically generated and set for the sequence and for the story's clip.
This drag and drop operation will turn on the synchronization, so changing MOS objects or GFXs after this action will be automatically synchronized between Octopus and Traco GFX.
Creating and Previewing GFXs from Stories' Existing MOS Objects
If an Octopus story contains MOS objects created by any Viz Pilot client application, Traco GFX can use them to create GFXs for sequences. This means, when an Octopus story is opened and it's MOS objects were not created by Traco GFX, then those MOS objects will be imported from the story to Traco GFX. To achieve this, users only have to open the story's clip from the Octopus app while Traco GFX is opened (see deatils in Octopus documentations).
This feature can be usefull for editors also, who usually do not create MOS objects and GFXs, they just need to check clip with graphical objects preview.
IMPORTANT! If a sequence already has GFXs assigned and it will be opened from the Octopus app, then all GFXs in Traco GFX Timeline will be overriden with the imported MOS Objects received from Octopus story.
iNews
Production cues with timing can be created in iNews stories with a single drag and drop operation from the Traco GFX Timeline.