Copyright © 2021 Traco Systems a.s.
version 2021.7.1
Introduction
Traco ACS is the main backend service group for all applications developped by Traco Systems for the Avid MediaCentral Platform. Traco ACS is directly connected to the MediaCentral | Cloud UX ACS Gateway and is required to run and handle the communication between the Cloud UX Traco applications and third party systems like Octopus Newsroom, Viz Content Pilot, Traco MediaRenderers, Traco MediaDistributor Nodes, Traco AI, Traco Database, etc.
This version of Traco ACS consists of multiple components which must be installed separately:
- Traco ACS v1.x Installed as a Windows Service
- Traco ACS v2.x Installed as a Cloud UX Feature Pack
- Traco ACS Renderer Installed as a Cloud UX Feature Pack
- Traco ACS Database
Licensing Overview
All products developped by Traco for the Avid MediaCentral Platform (Octopus, Traco GFX, Traco MediaDistributor, etc.) are licensed via Traco ACS. These licenses are distributed only by Traco Systems. To obtain a new license or upgrade existing license for components and features, please contact us via sales@traco.sk.
Beside the licenses from Traco, the main Cloud UX components (Octopus, Traco GFX, Traco MediaDistributor, Traco ACS) must be licensed via the regular Cloud UX licensing app also. To obtain Cloud UX licenses please contact Avid Sales.
Installation prerequisites
Before You Begin
- Identify the hostname and/or IP address of the following systems: MediaCentral | Cloud UX.
- Obtain Traco ACS windows service installation files.
- Obtain Traco ACS feature pack installation zip.
- Obtain Traco ACS Renderer feature pack installation zip.
- Obtain MediaCentral | Cloud UX license for Traco ACS service.
- Obtain license for Traco ACS.
- Prepare a windows machine where the Traco ACS windows service will be installed.
Compatibility
This product has been tested on the following platforms and with the following products:
- Avid MediaCentral | Cloud UX v2019.2 and later
- Avid Interplay (MediaCentral PAM) v2018.6 and later
- Octopus Newsroom v8 and later
- Octopus App for Cloud UX v1.2 (2020.3) and later
- Viz Content Pilot v8.x and later
- Traco GFX App for Cloud UX v1.2 (2020.3) and later
- Traco MediaRenderer v1 and later
- Traco MediaDistributor App for Cloud UX v1.2 (2020.3) and later
- Traco AI Platform v1 and later
Traco ACS v1.x - Windows Service
Hardware and Software Requirements
Installation of the Traco ACS v1.x Windows service is necessary for all Cloud UX installations if any app from Traco is included in the MediaCentral Platform. We recommend installing this service on a dedicated machine, however it can be installed beside any other component, because the resources consumed by this service are insignificant. Virtualization is supported.
Recommended configuration of the machine hosting this service:
- 4 cores
- 10 GB RAM
- 80GB HDD
- Windows Server 2012 or later
- .NET Framework 4.5.1 or later
Network Communication Requirements
- Service needs to communicate with the Cloud UX ACS Gateway which can run on any Cloud UX master node (default port is 9900).
- Service needs to communicate with the API of the used third party systems like Octopus Newsroom, Viz Pilot Data Server, Viz Preview Server, Traco AI, etc.
- Service needs to have read/write access to network shared folders which are used by specific Traco MediaDistributor workflows. For details see Traco MediaDistributor Dcoumentations. To fulfill this requirement we recommend setting the windows service to run under a specific windows or domain user with all necessary rights for the shared folders.
- General Network Communication Diagram (Port Usages)
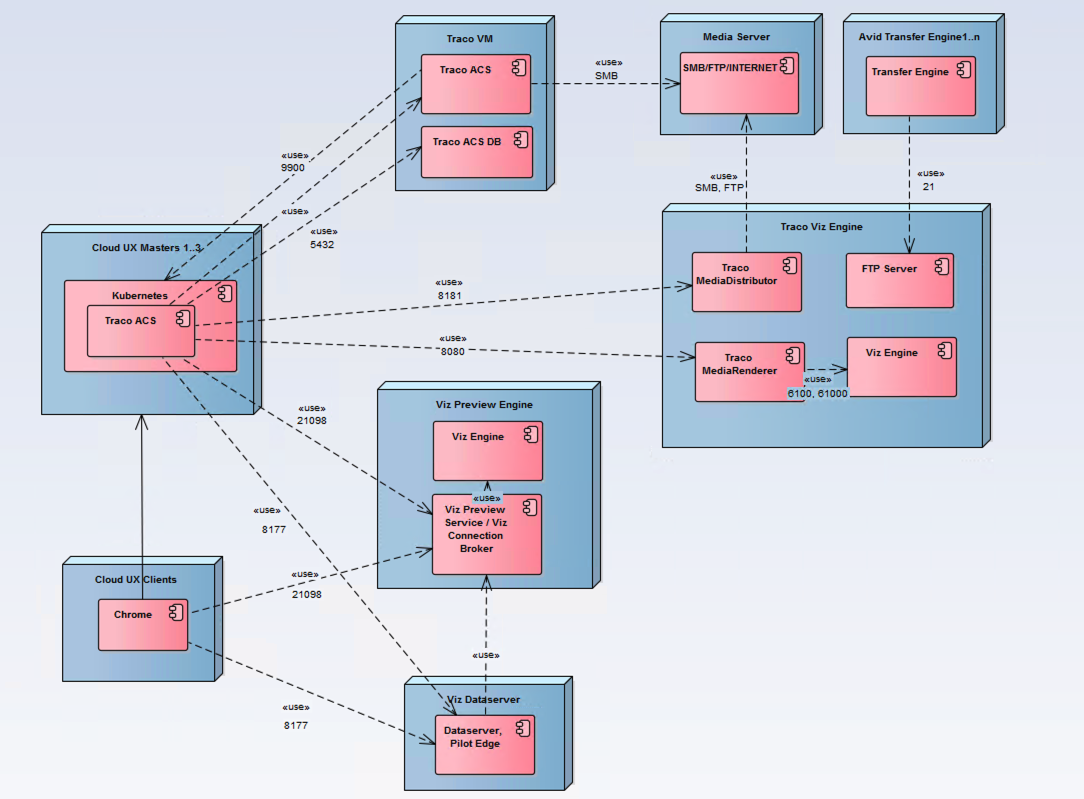
Installation
- Unpack the installer.
- Run the .msi and continue with the installation steps.
- When prompted, enter the hostname or IP address of the Avid MediaCentral | Cloud UX single server or the virtual cluster.
- Finish the installation.
Licensing
Valid license of Traco ACS is required to start the windows service and enable the features.
Request New License
- Go to C:\Program Files\Traco Systems\Traco ACS\logs.
- Locate and open the log files with the actual date in the subfolders.
- Locate line with content: “INFO|Application name: TracoACS, UID:... ”.
- Copy and send the whole line's text to Traco Sales department (sales@traco.sk) with your detailed license request.
Applying the Licenses Received from Traco
- Go to C:\Program Files\Traco Systems\Traco ACS.
- Paste the “License.lic” and “TracoLicense.lic” files to the root of the Traco ACS folder.
- Start the Traco ACS windows service.
Configuration
The only necessary configuration field is the hostname or IP address of the Avid MediaCentral | Cloud UX single server or the virtual cluster which was set during the installation process.
Changing the Hostname or IP Address
Changeing the hostname or IP address of the Avid MediaCentral | Cloud UX single server or the virtual cluster can be done by changing the “ACS_GATEWAY_HOST” windows environment variable.
Additional Customization
Traco ACS supports all additional environment variables which can be used for customizing MediaCentral | Service Toolkit applications. The complete list of available environment variables can be found at Avid Developers' Website.
Redundancy
Traco ACS v1.x can have multiple service instances installed on different machines to keep the Traco apps running even if a service instance stops. The installation of additional service instances is done in the same way as it is for a single service instance installation.
Note: Each instance of Traco ACS v1.x needs to have separate Traco licenses.
Troubleshooting
Log files can be found in folder C:\Program Files\Traco Systems\Traco ACS\logs.
Uninstallation
- Go to windows services and stop Traco ACS.
- Go to Control Panel -> Programs and Features.
- Select Traco ACS.
- Click Uninstall and complete the uninstall process.
Note: Uninstalling the service does not delete the licenses and logs.
Upgrade
To install a new release of Traco ACS start with uninstalling the old version. After the old version was uninstalled, a new version can be installed the same way as it is described in the installation chapter of this article. This process will keep all configurations of the previously installed Traco ACS, however it is necessary to specify again the hostname or IP address of the Avid MediaCentral | Cloud UX single server or the virtual cluster during the installation.
Traco ACS v2.x - Cloud UX Feature Pack
Network Communication Requirements
- Service needs to communicate with the Traco ACS Database (if configured) from each Cloud UX master node or single server.
- Service needs to communicate with the API of the used third party systems like Octopus Newsroom, Viz Pilot Data Server, Viz Preview Server, Traco AI, etc.
- General Network Communication Diagram (Port Usages)
Creating the configs
To run the Traco ACS feature pack with all functionalities, it's Cloud UX Kubernetes config map has to be configured.
- Open traco-acs config map via Kubernetes and set the following fields:
    "tracoacs_db_dbname": "",
    "tracoacs_db_host": "",
    "tracoacs_db_password": "",
    "tracoacs_db_port": "",
    "tracoacs_db_username": "",
    "tracoacs_gfx": "true"
Traco ACS can be installed without specifying the database connection fields' values in the config map, however, for workflows which require access to Traco ACS Database, the connection fields must be set correctly. Please, consult the settings with Traco Support before specifying database connection values.
Installation
- Upload the Traco ACS feature pack to your Cloud UX primary master node or single server.
On Windows you can use WinSCP while on Linux you can use the scp command in terminal. - Connect via ssh into your Cloud UX primary master node or single server where you uploaded the Traco ACS feature pack.
- Import the Traco ACS feature-pack.
avidctl feature-pack import <path-to-feature-pack>/traco-acs.zip - For Mediacentral | Cloud UX earlier then v2018.11 you must upgrade the helm repo manually.
helm repo update - Install the feature pack.
avidctl feature install --feature avid-releases/traco-acs --name traco-acs --version=<version>
Note: The exact version number of the feature pack can be identified from the output of the feature-pack import command (step 3 of this chapter). - If you are reinstalling or upgrading the Traco ACS feature pack, it is necessary to delete the old traco-acs pod from kubernetes if it was not deleted automatically after the Traco ACS feature pack installation. For more info about deleting pods please refer to MediaCentral | Cloud UX documentations.
Upgrade, Modifications, Maintenance, Debugging
Since Traco ACS is a regular Cloud UX feature pack, upgrade, modifications, maintenance and debugging operations can be accomplished using regular Cloud UX tools. For more info about Cloud UX admin tools and processes please refer to MediaCentral | Cloud UX documentations.
Traco ACS Renderer - Cloud UX Feature Pack
Installation
- Upload the Traco ACS Renderer feature pack to your Cloud UX primary master node or single server.
On Windows you can use WinSCP while on Linux you can use the scp command in terminal. - Connect via ssh into your Cloud UX primary master node or single server where you uploaded the Traco ACS Renderer feature pack.
- Import the Traco ACS Renderer feature-pack.
avidctl feature-pack import <path-to-feature-pack>/traco-acs-renderer.zip - For Mediacentral | Cloud UX earlier then v2018.11 you must upgrade the helm repo manually.
helm repo update - Install the feature pack.
avidctl feature install --feature avid-releases/traco-acs-renderer --name traco-acs-renderer --version=<version>
Note: The exact version number of the feature pack can be identified from the output of the feature-pack import command (step 3 of this chapter). - If you are reinstalling or upgrading the Traco ACS Renderer feature pack, it is necessary to delete the old traco-acs-renderer pod from kubernetes if it was not deleted automatically after the Traco ACS Renderer feature pack installation. For more info about deleting pods please refer to MediaCentral | Cloud UX documentations.
Upgrade, Modifications, Maintenance, Debugging
Since Traco ACS Renderer is a regular Cloud UX feature pack, upgrade, modifications, maintenance and debugging operations can be accomplished using regular Cloud UX tools. For more info about Cloud UX admin tools and processes please refer to MediaCentral | Cloud UX documentations.
Configuration
All configuration fields of the Traco ACS Renderer service can be modified in Traco GFX Admin App
Traco ACS Database
For database installation or modifications please contact Traco Technical Support.
Traco ACS Components Usage Overview
The following table defines the list of required Traco ACS components which are necessary to run Traco apps inside Cloud UX, like Cloud UX | Octopus, Cloud UX | Traco GFX and Cloud UX | Traco MediaDistributor
| Traco ACS v1.x | Traco ACS v2.x | Traco ACS Renderer | Traco ACS Database | |
|---|---|---|---|---|
| Octopus | required | not required | not required | not required |
| Traco GFX | required | required | required | not required |
| Traco MediaDistributor | required | required | not required | required |
For whole Cloud UX environment only one instance of each Traco ACS component is required, even if integrating with multiple Cloud UX | Traco apps, e.g. if a Cloud UX environment includes multiple Cloud UX | Traco apps (Octopus + Traco GFX + Traco MediaDistributor), it is sufficient to install only one instance of each Traco ACS component, so one instance of Traco ACS v1.x, one instance of Traco ACS v2.x and one instance of Traco ACS Database. However, scaling the number of Traco ACS components is highly recommended to ensure component redundancy.
On the other hand when integrating only with Cloud UX | Octopus app, only Traco ACS v1.x is required, while Traco ACS v2.x and Traco ACS Database are not required.